Wednesday, March 11, 2015
Increased Security for Google Apps APIs with New OAuth Scopes
Among the many benefits of OAuth is the ability to provide access to Administrative APIs without exposing admin usernames or passwords. While the Provisioning API has featured OAuth support for some time, were excited to announce that developers now have even more control over access to the API. The Provisioning API now has four separate OAuth scopes - one each for the users, alias, organization units, and groups methods. For example, this means that developers can enable an application to have access scoped to only groups and not user data. For more information about the new scopes, please see the authorization section of the Provisioning API Developers Guide.

The previous Provisioning API scope is now deprecated, and new applications should reference these new, more granular and secure scopes. While the previous scope will still work for your existing scripts during the deprecation period, it will eventually not produce valid request tokens. We strongly encourage Google Apps developers to update your applications to take advantage of this security improvement.
Provisioning isnt the only Google Apps API with recent security improvements. Were also happy to announce that developers can now authorize use of the Reporting API via OAuth! Now Google Apps developers can start building secure automated reporting and dashboard applications without worrying about managing ClientLogin tokens.
Check out this article for more information about using OAuth with the Provisioning and Reporting APIs.
Want to weigh in on this topic? Discuss on Buzz
Sunday, March 8, 2015
Using 2 legged OAuth with the Google Tasks API for Google Apps domain administrators
- Any use of the Tasks API needs to reference a project in the APIs Console, as the Console is used to manage API quotas and other application settings (such as IP filters).
- The Tasks API needs to be explicitly enabled for your domain OAuth key and secret.
Referencing an APIs Console Project
The Tasks API needs to know which APIs Console project is sending requests to the API (so quota can be deducted, filters can be checked, etc.). To supply this information, you need to specify the API Key of your project within each request to the Tasks API-- even when using 2LO. This is done by specifying the API Key in a key URL query parameter.e.g.:
https://www.googleapis.com/tasks/v1/users/username/lists?key=<API_KEY>The Java client library can do this for you automatically if you specify it after initializing the
Tasks service: // Initializing the Tasks API service
Tasks service = new Tasks("2-LO Tasks Test", httpTransport, jsonFactory);
service.accessKey = API_KEY;
Enabling the Tasks API for your domain OAuth key and secret
Also, before your API requests will be successful, you will need to change a few things in your OAuth Consumer Key and Secret configuration. In the Manage OAuth domain key page available in the Google Apps Control Panel (under advanced tools), you will need to make sure that the option Enable this consumer key is checked and the option saying Allow access to all APIs is unchecked. This may sound counterintuitive, but this option will give you access to a specific set of APIs and is necessary to access the Tasks API.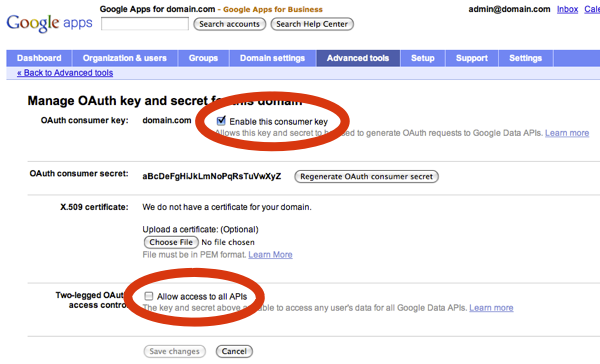
Then you will need to specify which APIs you want your domain OAuth key and secret to have access to. You will be able to do this in the Manage third party OAuth Client access page where you will need to list manually all the scopes that your domain key will have access to. For example for your token to have access to the Google Calendar API and the Google Tasks API use:
e.g.: https://www.google.com/calendar/feeds/, https://www.googleapis.com/auth/tasks
You should then be all set to use 2LO with your Google Apps domain key and secret.
For a more detailed and step-by-step explanation with code samples on how to use 2LO if you are a Google Apps domain admin, I invite you to have a look at the newly published article: Using 2-Legged OAuth with Google Tasks API for Google Apps domain administrators.
 | Nicolas Garnier profile | twitter | events Nicolas joined Google’s Developer Relations in 2008. Since then hes worked on commerce oriented products such as Google Checkout and Google Base. Currently, he is working on Google Apps with a focus on the Google Calendar API, the Google Contacts API, and the Tasks API. Before joining Google, Nicolas worked at Airbus and at the French Space Agency where he built web applications for scientific researchers. |
Want to weigh in on this topic? Discuss on Buzz
Monday, March 2, 2015
Part 2 Simplify Blue Ocean Make Consultants !

“We do no market research. We dont hire consultants. The only consultants Ive ever hired in my 10 years is one firm to analyze Gateways retail strategy so I would not make some of the same mistakes they made [when launching Apples retail stores]. But we never hire consultants, per se. We just want to make great products. “
– Steve Jobs
– Steve Jobs
Ironically, when strategy/marketing/innovation consultants and Blue Ocean Strategy (BOS) black belts pitch for a project, Steve Jobs and Apple will probably be mentioned, or used as an example for creating value innovations, and making the competition irrelevant.

Steve Jobs, thanks for making that clearer! So, next time you want to create value innovations, perhaps hiring consultants to practically do everything (including help you to fill up all the magical templates) from conceptualization to a sizzling blueprint for innovation is perhaps not the best way to go.
“It’s not about pop culture, and it’s not about fooling people, and it’s not about convincing people that they want something they don’t. We figure out what we want. And I think we’re pretty good at having the right discipline to think through whether a lot of other people are going to want it, too. That’s what we get paid to do. So you can’t go out and ask people, you know, what’s the next big [thing.] There’s a great quote by Henry Ford, right? He said, ‘If I’d have asked my customers what they wanted, they would have told me ‘A faster horse.’’’
– Steve Jobs
Thanks, Steve!
BLUE OCEAN WORKSHOP
A few weeks back, I attended a 2 day (free) Blue Ocean Strategy (BOS) at the UCSI Blue Ocean Strategy Regional Centre (1st - 2nd December, 2010), and during the process I got to meet and share ideas with several of the big shots in the UCSI BOS team.

Based on their e-mail invitation, the title of the workshop was “Blue Ocean Strategy Initiative for Education: Creating New Marketspace & Championing New Growth”, but then when I arrived I got to learn that we would not be talking much about education, and that made me furious. Also, I had pulled out a tooth a few days earlier (picture above), so my patience was obviously rather toothless. Luckily the BOS team had Yoann Sapanel (one of the facilitators) to cool me down, and clarify why they would not be talking much about education. Although, I didnt buy the good old We are teaching you how to fish..." excuse, I have to admit, he was the only BRILLIANT presenter and facilitator during the workshop, according to my high expectations.
Though, thanks to my outspoken frustrations, they did explore briefly two Universities that had used BOS to innovate, which were Limkokwing University (Rented a building in London, and brought the University (learning) experience to UK) and Universiti Sains Malaysia (Used BOS on their own, which resulted in getting the APEX Status). As the facilitator was mumbling with a bad accent, it was not easy to really understand what he was trying to say (But, at least some relevant points!).
During the workshop, we did explore several of the essential BOS tools, and worked through the BOS process, before presenting our BOS project.
1-MINUTE BOS CRASH COURSE
Here is a 1-minute Blue Ocean Strategy (BOS) visualization crash course:
During both days, each team (consisting of 5-6 members) worked on a BOS project. UCSI BOS team preselected a few industry segments to choose from, which included taxi, hospital, mall, and cafeteria. Personally, I wanted really to explore a BOS within education, but that was a big No-No, as they wanted to teach us how to fish, and since most of the participants were from the education sector it would not be appropriate to share University-Leaks. That is when I felt that there was a hidden agenda to this so called free workshop. Where they using us to fish for new ideas for their on-going BOS projects?
But, since it was free, I suppose it was a win-win situation for all. We learned the BOS, and they discovered perhaps a few new useful ideas, which they could use elsewhere. If that was the case, they should have been upfront honest and professional about it. But then again, BOS and Value Innovation has never really emphasized (to my knowledge) the importance of social responsibility, protecting the environment, and caring about cultures, which are essential for long-term sustainability of mankind (and Earth).
Adam Werbach will clarify and enlighten you on what I am really trying to say:
1-MINUTE BOS CRASH COURSE
Here is a 1-minute Blue Ocean Strategy (BOS) visualization crash course:
- Visual Awakening
Use the as if strategy canvas to compare your current strategy with competitors and see where it needs to change. - Visual Exploration
Use the Six Paths Framework to look across the six conventional boundaries of competition to systematically reconstruct market assumptions to create new market space. During this process, you observe your own products and/or services, and distinctive advantages of alternative products/services. To look beyond existing customers and develop insights on non-customers, use the 3 Tiers of Noncustomers. Then, use the ERRC Grid to see which factors to eliminate, reduce, raise and create to find a leap in value (Value Innovation). - Visual Strategy Creation
Draw your To Be strategy canvas based on insights from the visual exploration phase. Then develop a clear-cut and compelling tagline, which captures the essence of the "to be" strategy in a way that speaks forcefully to both a companys employees and the target mass of buyers. - Visual Communication
Apply the 4 Actions Framework, and present your strategic options to stake holders and fine tune. Then communicate your new BOS with existing strategy canvas, ERRC grid and To Be strategy canvas. For easy comparison, show your before-and-after strategic profiles on one page, and make sure that the factors to eliminate, reduce, raise and create are clearly identified. Use BOS sequence for strategic validation, and use Execution Hurdles, Tipping Point Leadership, and Fair Process to execute effectively. What do you think?
During both days, each team (consisting of 5-6 members) worked on a BOS project. UCSI BOS team preselected a few industry segments to choose from, which included taxi, hospital, mall, and cafeteria. Personally, I wanted really to explore a BOS within education, but that was a big No-No, as they wanted to teach us how to fish, and since most of the participants were from the education sector it would not be appropriate to share University-Leaks. That is when I felt that there was a hidden agenda to this so called free workshop. Where they using us to fish for new ideas for their on-going BOS projects?
But, since it was free, I suppose it was a win-win situation for all. We learned the BOS, and they discovered perhaps a few new useful ideas, which they could use elsewhere. If that was the case, they should have been upfront honest and professional about it. But then again, BOS and Value Innovation has never really emphasized (to my knowledge) the importance of social responsibility, protecting the environment, and caring about cultures, which are essential for long-term sustainability of mankind (and Earth).
Adam Werbach will clarify and enlighten you on what I am really trying to say:
THE i-WELLNESS VILLAGE
Our group worked on transforming an old non-performing hospital, and we conceptualized a brilliant BOS, entitled The i-Wellness Village (Just added The and Village. Original BOS was just i-Wellness) with a compelling tagline Live Your Dreams!. Basically, we sold the old hospital, and then bought and transformed a hotel resort (working with partners) into the perfect old-folks resort where they could live their dreams.
Today, populations around the world are getting older, governments are going bankrupt, and they are looking for ways to cut cost. At the same time, families are getting smaller, less to take care of older people, meaning the government must increasingly establish new old-folks hospitals and homes, which are extremely expensive in countries like Scandinavia, Japan, South Korea, and so on. While the cost is high, many old people are miserable with such arrangements, especially during winter.
The i-Wellness Village BOS solves all these issues, as old-folks get to live their dreams in amazing resorts (sun, beach, sea, swimming pools, restaurants, villages, shopping, golf, bus tours, etc.) that also provide all the necessary hospital support (value added), and governments (e.g. Norway) save tremendous cost by outsourcing it to Malaysia (cost savings). More importantly, old-folks gets to experience a happier ending to their lives.
At the end of the workshop, we had to pitch our BOS project to two real venture capitalists (each had 50 million simulated dollars to invest) and the other participants. At that time, our BOS project had many loopholes and my teammates were a bit worried that we would get slammed. Anyway, why worry? It is just some simulated fun, so I took up the challenge to present our BOS project. Little did I know that Dr. Robert Bong, who was one of the venture capitalist evaluators (Also a BOS champion!) would not only slam the project (loopholes), he would literally TKO us (or at least me!), and end with a damning, I will not invest in this project. I wanted to challenge him on all points, but his sharpness and our loopholes were too deep, meaning if I did challenge I would probably get total brain damage. In short, I said Thats all and I sat down.
However, being up there knocked out on my first ever pitch to a venture capitalist, was a refreshing and valuable learning experience. Also, I learned a great BOS like The i-Wellness Village will always initially have many loopholes, meaning great ideas need time to nurture, and one should never take No for an answer (Tony Fernandes). Though, I do hope Dr. Robert Bong changes his mind, or at least consider investing in such a project. I suppose if I had pitched it today, he would have seen the big picture clearly. Anyway, the other venture capitalist invested 20 million (simulated) dollars, and told us this project could make a lot of money. The i-Wellness Village will not only make a lot of money, it will empower old-folks to live their dreams and have a happier ending. AWESOME!
The The i-Wellness Village is perfect for Malaysia, so I do hope other venture capitalists take it up. Perhaps such projects are already under development in Malaysia.
So, my final verdict on Blue Ocean Strategy tools is...

USEFUL for big projects, but USELESS for daily inspirational innovations.
Could we simplify BOS (tools), and make consultants irrelevant in the innovation process?
Part 3 - ZaidLearns Blue Ocean Strategy for 2011
Part 1 - Would Nemo Survive Using the Blue Ocean Strategy?
Friday, February 27, 2015
Great Shopping Deals Year Round Not Just Black Friday!
Obviously everyone knows about Amazon, but do you know that you can easily find the price history of any item on Amazon to tell if youre getting a good deal or not?!
.jpg)
First things first, head to Amazon, and pull up an item that you are interested in. I pulled up Avery 5160 Labels... my favorite! :)

Copy the link from your address bar (e.g.: http://www.amazon.com/Avery-Address-Labels-Printers-08160/dp/B00004Z5SM/ref=sr_1_2?ie=UTF8&qid=1353641122&sr=8-2&keywords=avery+5160+labels ). You can copy the link by choosing Edit > Copy, or by doing Control + C on a PC, or Command + C on a Mac.

In the top right hand corner, there is a box that says "Enter Amazon URL or keywords to find products." Click in that box and paste in the web address that you just copied. You can paste the link by choosing Edit > Paste, or by doing Control + V on a PC, or Command + V on a Mac.

Click "Find Products" next to where you pasted the link. If you scroll down a little bit, youll see a chart that shows the items price history.

If you keep scrolling, youll find a list of the dates when the item was highest priced and lowest priced, as well as the last 5 price changes.

So... if youre looking to find out if youre getting a good deal on the item you can easily tell! Right now these labels are pretty reasonably priced... perhaps I need to stock up.
But, wait... I havent even told you the best part yet! If you create a free account for the website, you can get email alerts when the item drops below a certain price!
Head back to the main website, http://camelcamelcamel.com/ . Click "Sign Up" (in the top right hand corner, or towards the middle right of the screen.)

Paste back in your item link. In that big maroon box, it says "Create Amazon price watches for: ...your item..." Right below that, there is a green box that says "Amazon." In the desired price box, enter your desired price.

When your item drops below that price, CamelCamelCamel will send you an email alerting you of the new price. (For those of you worried about junk mail... Ive used this option for a few months and I havent noticed any additional spam from it!)
If you want to check which items you are tracking, you can always click "Your Price Watches" at the top of the page.

printer ink! I am absolutely loving it!
Id love to hear about what items youre loving from Amazon that youre going to enter into the price tracker... and Id love to hear about any Black Friday excursions you went on!!!!
Wednesday, February 18, 2015
High Quality Social Media Icons
Free Download High Quality Social Media Icons for iPhone & technology blogs. These social media icons are of high quality and appealing to become the very asset of your blog. Enjoy!
Type : PNG
Category : Icons
License : Free
Author : Designbolts
Download
Sunday, February 15, 2015
Java program to find whether a number is armstrong or not

class Armstrong
{
public static void main(String...s)
{
int m,n,i,j=0;
n=Integer.parseInt(s[0]);
m=n;
while(n!=0)
{
i=n%10;
j+=(i*i*i);
n/=10;
}
if(j==m)
System.out.println("
Number is armstrong");
else
System.out.println("
Number is not armstrong");
}
}
27 Free Perspective App Screen PSD Mockups

If you’re designing an app, you’ll need some screen mock-up templates, to showcase your design. if youre ui designer and develop an mobile app, you should design something app screen showcase and shown to the client included angle perspectives.
So, in this post, Collection of 27 Free PSD Perspective App Screen Mockups. use the smart objects to place your design, you can easily change the background color and the depth size of the screens.
1- App Screen Mock-Up Perspective PSD

2- Perspective App Screen Mock-Up PSD

3- Isometric Perspective MockUp PSD

4- Perspective App Screens Mock-Up PSD

5- Iphone 6 Wrap Around Screen Mockup PSD

6- Free PSD App Screen iOS 7

7- iOS 7 Weather App Design PSD

8- Free 3D Perspective Mockup PSD

9- Perspective App Screen PSD Mock-Up

10- Perspective Tablet Mock-Up PSD

11- Perspective App Screens Mock-Up PSD

12- 3D Mobile App Screens Mock-Up PSD

13- Free PSD Mockup Isometric Mobile App Screen

14- Free PSD Perspective App Screens Mock-Up

15- App Screen Showcase Mockup PSD

16- App Screen Presentation Mock-ups PSD

17- App Screens Perspective MockUp PSD

18- Free PSD Perspective Mockup Template

19- Perspective Mobile Screen Mock-up PSD

20- Android / iPhone Perspective App Mockup PSD

21- iPhone App Front Screen MockUp PSD

22- PSD Perspective Mobile Mock-up Screen

23- Perspective Screen MockUp PSD

24- Free PSD Perspective Screen MockUp

25- Free PSD Mobile Screen MockUp

26- Perspective App Screens PSD Mockup

27- App Screen MockUp PSD

Professional One Page Resume PSD Temlate

Free Download Professional One Page Resume Template in PSD File, perfect to advertise your skills, your personality, and your experience to get a dream job opportunities and clients.
Type : PSD
Category : Print Templates
License : Free
Author : Ibrandstudio
Download

Reading AMSR 2 Data into GeoTIFF raster using gdal grid
The following is not an exhaustive description, but extended notes on how to read AMSR-2 files, which possibly may be of help to others trying to solve a similar task.
For some, the final commented script at our github page may be enough help, the text below tries to explain the most important steps in this script:
The various frequency bands of AMSR-2 have different resolution (see the product specs and the user manual ), we choose the L1R dataset, where the data is already processed to match the geolocation stored in the lat/long band for 89GHz.
Information on the hdf image can be retrieved with gdalinfo:
gdalinfo C:UsersmaxDocumentsGW1AM2_201301311114_050A_L1SGBTBR_1110110.h5
The metadata printed out contains the names of the subchannels, as seen here:
and information about a specific channel can be retrieved by using gdalinfo on exactly this subchannel-name from the metadata:
gdalinfo HDF5:"C:UsersmaxDocumentsGW1AM2_201301311114_050A_L1SGBTBR_1110110.h5"://Brightness_Temperature_(89.0GHz-A,V)
Opening one of the bands in QGIS, the data looks like this (all images in this post are © JAXA EORC ):
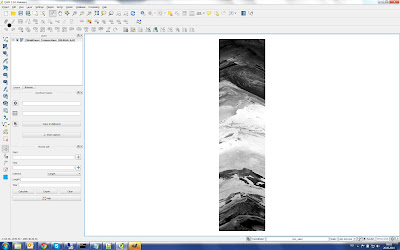
In this example we want to convert the data into the NSIDC sea ice raster (EPSG:3411) covering the Arctic areas, using the gdal_grid utility, which creates a regular grid out of a point collection.
Important to know: The 89GHz channel is divided into 89A and 89B, and only both together give the full resolution of about 5km. Each 89 GHz channel has an associated latitude and a longitude raster giving the coordinates for each pixel. For the L1R product, the geolocation information of other frequencies with lower resolution can be derived from the 89A longitude and latitude raster by using only their odd columns.
In the first step, I unzip the gz - zipfiles, then open the hdf file (*.h5). The various frequency bands are stored in Subdatasets, so you open the hdf file with gdal.open(), but then use again gdal.open() for a subdataset (for information on the bands you can run gdalinfo on the *.h5 files:
HDFfile = gdal.Open( rC:UsersmaxDocumentsGW1AM2_201301311114_050A_L1SGBTBR_1110110.h5 )

HDF_bands = HDFfile.GetSubDatasets()

#HDF Subdatasets are opened just as files are opened:
HDF_SubDataset = gdal.Open(HDF_bands[channel][0])
HDF_SubDataset_array = HDF_SubDataset.ReadAsArray()

HDF_Lat89A = gdal.Open(HDF_bands[46][0])
HDF_Lat89A_array = HDF_Lat89A.ReadAsArray()

HDF_Lon89A = gdal.Open(HDF_bands[48][0])
HDF_Lon89A_array = HDF_Lon89A.ReadAsArray()
In the next step, a create a comma-separated file containing longitude, latitude, brightness values for each raster point. This comma separated file is then the input for gdal_grid. I loop through each pixel and write the three values ( longitude, latitude, brightness ) into a csv-file.
So for the 89GHz channel, I write both 89A and 89B to a csv-file:
#Add header line to textfile
textfile = open( AMSRcsv, w)
textfile.write(lon,lat,brightness
)

## Loop through each pixel and write lon/lat/brightness to csv file
for i in range(rows):
    for j in range(cols):
        wgs84=pyproj.Proj("+init=EPSG:4326")
        EPSG3411=pyproj.Proj("+init=EPSG:3411")

        lonA = HDF_Lon89A_array[i,j]
        latA = HDF_Lat89A_array[i,j]

        # lon/lat written to file already projected to EPSG:3411
        (lonA_3411, latA_3411) = pyproj.transform(wgs84, EPSG3411, lonA, latA)
        brightnessA = HDF_Br89AH_array[i,j]* 0.01 #APPLYING SCALING FACTOR!

        lonB = HDF_Lon89B_array[i,j]
        latB = HDF_Lat89B_array[i,j]

        # lon/lat written to file already projected to EPSG:3411
        (lonB_3411, latB_3411) = pyproj.transform(wgs84, EPSG3411, lonB, latB)
        brightnessB = HDF_Br89BH_array[i,j]* 0.01 #APPLYING SCALING FACTOR!

        if 35 < latA < 90:
            textfile.write(str(lonA_3411) + , + str(latA_3411) + , + str(brightnessA) +
)

        if 35 < latB < 90:
            textfile.write(str(lonB_3411) + , + str(latB_3411) + , + str(brightnessB) +
)

textfile.close()
For the lower resolution channels, I use the odd numbers of the 89A long and lat channel:
#Add header line to textfile
textfile = open( AMSRcsv, w)
textfile.write(lon,lat,brightness
)

## Loop through each pixel and write lon/lat/brightness to csv file
for i in range(rows):
    for j in range(cols):
        wgs84=pyproj.Proj("+init=EPSG:4326")
        EPSG3411=pyproj.Proj("+init=EPSG:3411")

        #For low resolution the odd columns of Lon/Lat89 array to be taken!
        lonA = HDF_Lon89A_array[(i) ,(j*2+1)]
        latA = HDF_Lat89A_array[(i) ,(j*2+1)]

        # lon/lat written to file already projected to EPSG:3411
        (lonA_3411, latA_3411) = pyproj.transform(wgs84, EPSG3411, lonA, latA)
        brightnessA = HDF_SubDataset_array[i,j]* 0.01 #APPLYING SCALING FACTOR!

        if 35 < latA < 90:
            textfile.write(str(lonA_3411) + , + str(latA_3411) + , + str(brightnessA) +
)

textfile.close()
Now I can almost run the gdal_grid, but as described at http://www.gdal.org/gdal_grid.html I need to create a xml file describing my comma-separated csv file.
<OGRVRTDataSource>
 <OGRVRTLayer name="GW1AM2_201301010834_032D_L1SGRTBR_1110110_channel89H">
  <SrcDataSource>G:AMSRGW1AM2_201301010834_032D_L1SGRTBR_1110110_channel89H.csv</SrcDataSource>
  <GeometryType>wkbPoint</GeometryType>
  <GeometryField encoding="PointFromColumns" x="lon" y="lat" z="brightness" />
 </OGRVRTLayer>
</OGRVRTDataSource>
This xml file above can be created in a python script in the following manner, some more info here:
root = ET.Element("OGRVRTDataSource")

OGRVRTLayer  = ET.SubElement(root, "OGRVRTLayer")
OGRVRTLayer.set("name", AMSRcsv_shortname)

SrcDataSource = ET.SubElement(OGRVRTLayer, "SrcDataSource")
SrcDataSource.text = AMSRcsv

GeometryType = ET.SubElement(OGRVRTLayer, "GeometryType")
GeometryType.text = "wkbPoint"

GeometryField = ET.SubElement(OGRVRTLayer,"GeometryField")
GeometryField.set("encoding", "PointFromColumns")

GeometryField.set("x", "lon")
GeometryField.set("y", "lat")
GeometryField.set("z", "brightness")

tree = ET.ElementTree(root)
tree.write(AMSRcsv_vrt)
Now we finally can run gdal_grid, either command line: gdal_grid -a_srs EPSG:3411 -a average:radius1=4000:radius2=4000:min_points=1 -txe -3850000 3750000 -tye -5350000 5850000 -outsize 760 1120 -l GW1AM2_201301010834_032D_L1SGRTBR_1110110_channel89H GW1AM2_201301010834_032D_L1SGRTBR_1110110_channel89H.vrt GW1AM2_201301010834_032D_L1SGRTBR_1110110_channel89H.tif
or called from a Python script:
AMSRcsv_shortname =  GW1AM2_201301010834_032D_L1SGRTBR_1110110_channel89H
AMSRcvs_vrt = GW1AM2_201301010834_032D_L1SGRTBR_1110110_channel89H.vrt
AMSR_tif = GW1AM2_201301010834_032D_L1SGRTBR_1110110_channel89H.tif

radius1 = 4000
radius2 = 4000
os.system(gdal_grid -a_srs EPSG:3411 -a average:radius1= + str(radius1) + :radius2= + str(radius2) + :min_points=1 -txe -3850000 3750000 -tye -5350000 5850000 -outsize 760 1120 -l  + AMSRcsv_shortname +    + AMSRcsv_vrt +   + AMSR_tif)
The radius indicates in which distance around a given output raster point the algorithm searches for points falling into the NSIDC raster -- if too small, it will result in empty pixels, if too large there will be too much smoothing since many pixels are averaged into one.
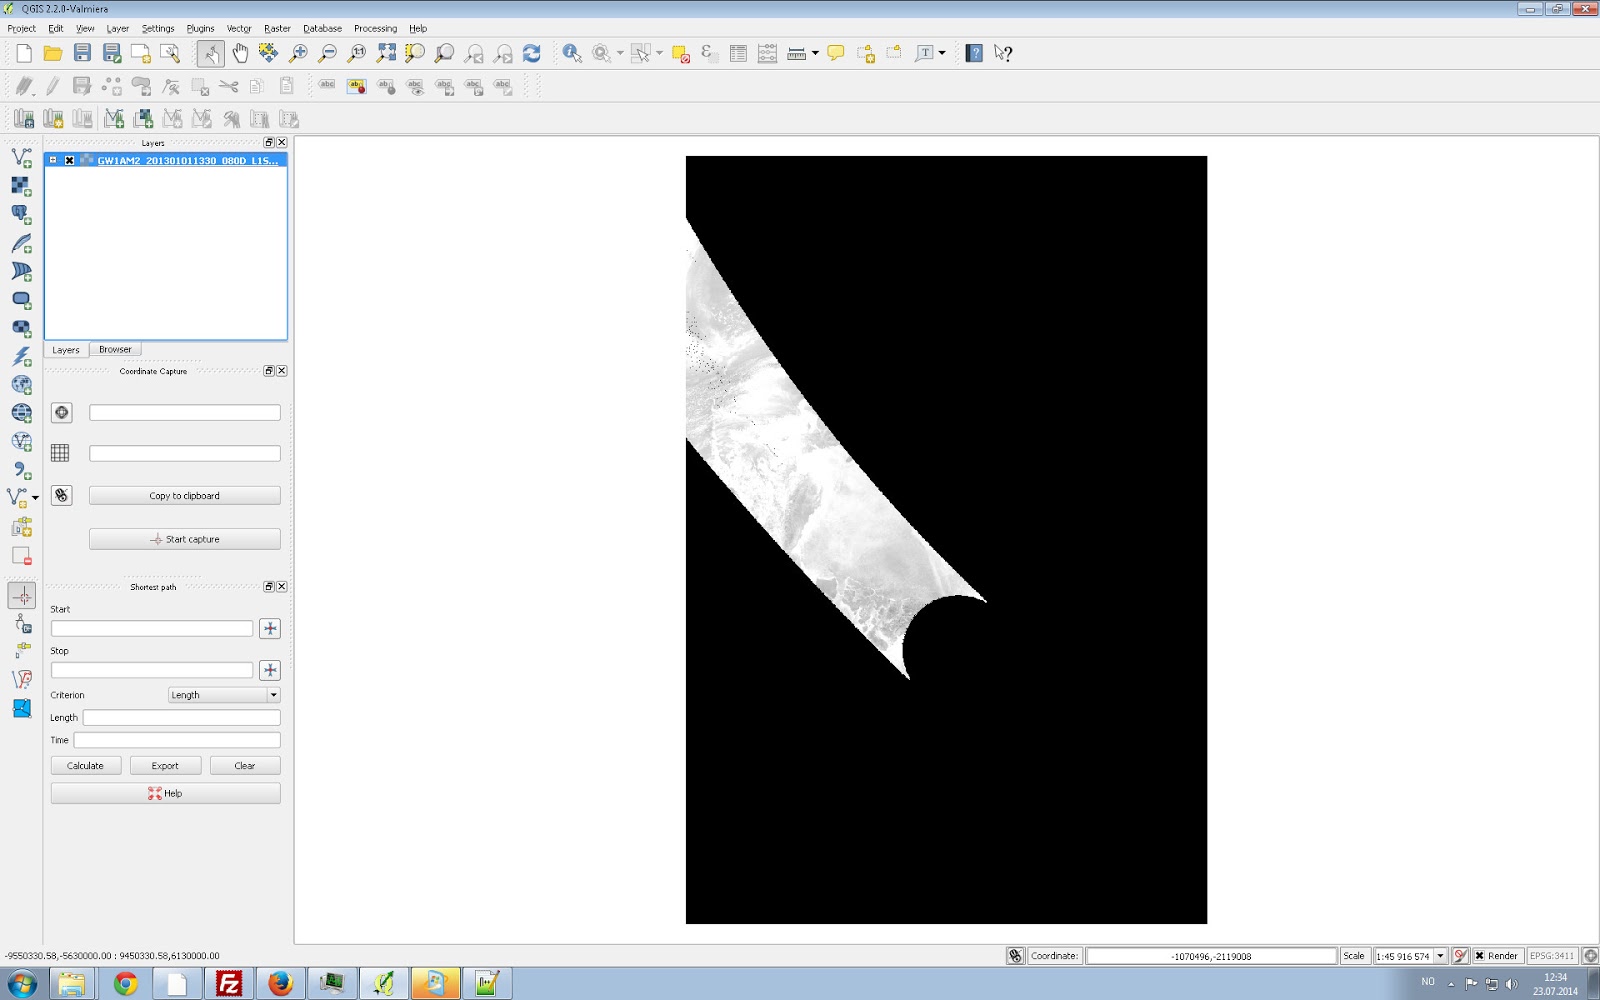
The result is, finally, the part of the swath falling into the NSIDC-raster:
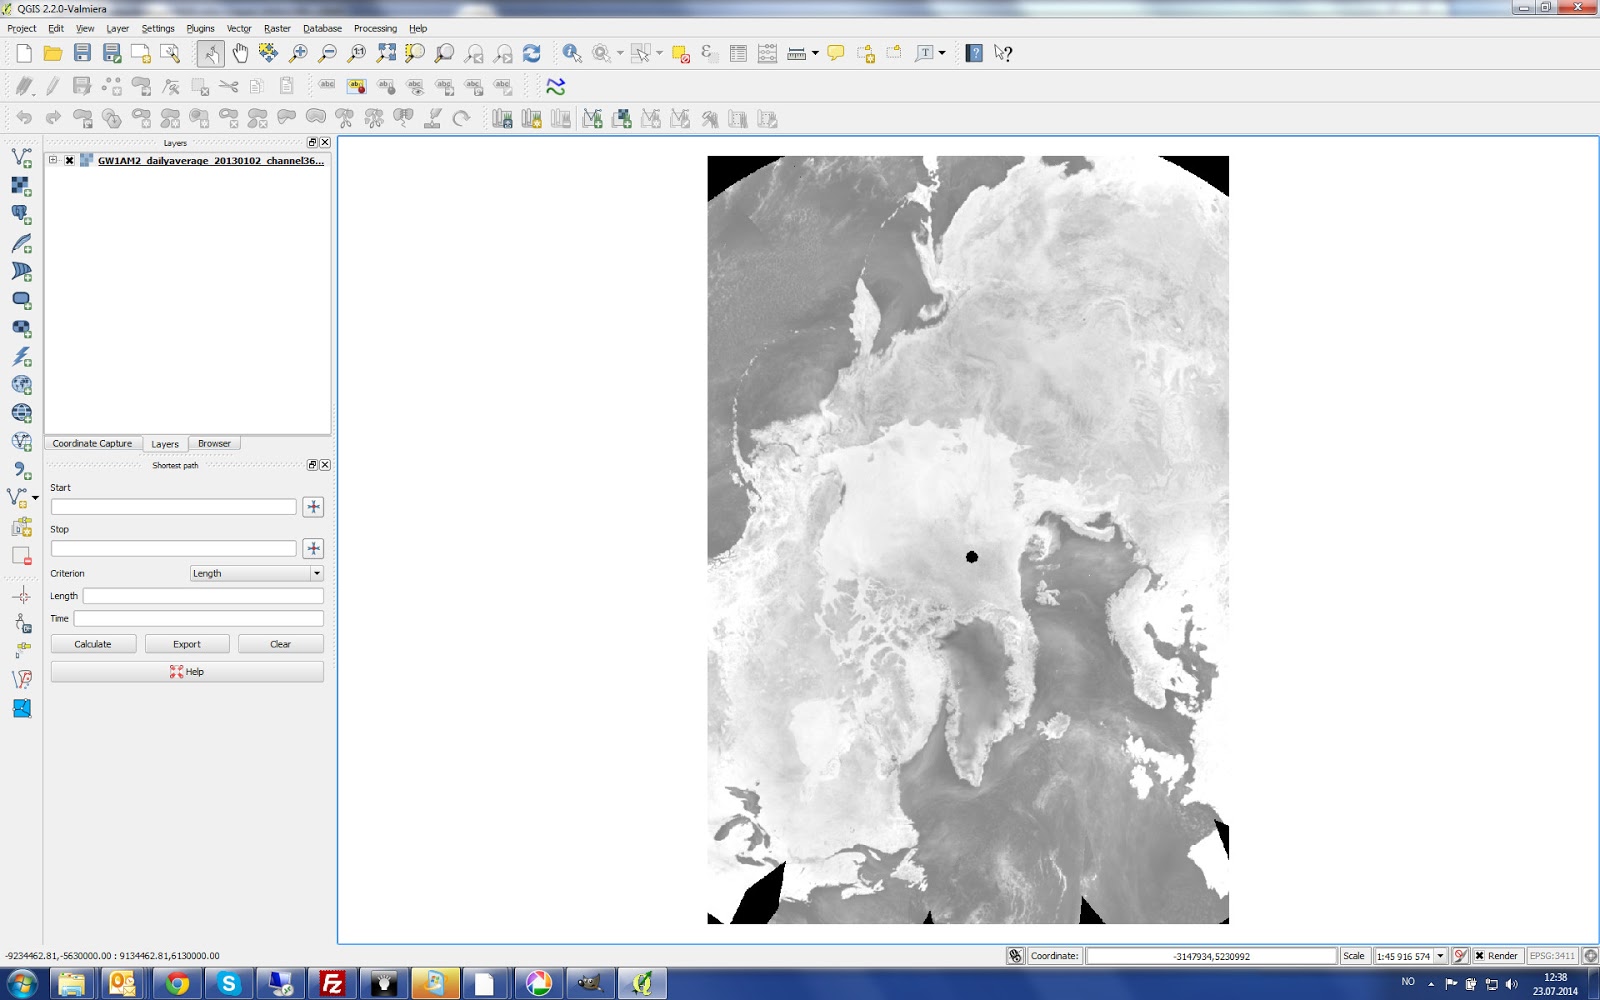
In a final step, I take all of such swaths for one day and average them into a full image of that given day, see the Average Daily function in the script for details (images © JAXA EORC ).
One issue using gdal_grid is its very low performance regarding speed (see this comment ), one 89GHz band takes 10 minutes and a lower resolution band 2 minutes calculation time. This is then about 25 minutes for all channels of one hdf file, and since every day has about 20 files, this means 8 hours for one averaged daily raster. gdal_grid may therefore not always be feasible until the speed issue is improved.
Subscribe to:
Posts (Atom)