Showing posts with label using. Show all posts
Showing posts with label using. Show all posts
Sunday, March 8, 2015
Using 2 legged OAuth with the Google Tasks API for Google Apps domain administrators
- Any use of the Tasks API needs to reference a project in the APIs Console, as the Console is used to manage API quotas and other application settings (such as IP filters).
- The Tasks API needs to be explicitly enabled for your domain OAuth key and secret.
Referencing an APIs Console Project
The Tasks API needs to know which APIs Console project is sending requests to the API (so quota can be deducted, filters can be checked, etc.). To supply this information, you need to specify the API Key of your project within each request to the Tasks API-- even when using 2LO. This is done by specifying the API Key in a key URL query parameter.e.g.:
https://www.googleapis.com/tasks/v1/users/username/lists?key=<API_KEY>The Java client library can do this for you automatically if you specify it after initializing the
Tasks service: // Initializing the Tasks API service
Tasks service = new Tasks("2-LO Tasks Test", httpTransport, jsonFactory);
service.accessKey = API_KEY;
Enabling the Tasks API for your domain OAuth key and secret
Also, before your API requests will be successful, you will need to change a few things in your OAuth Consumer Key and Secret configuration. In the Manage OAuth domain key page available in the Google Apps Control Panel (under advanced tools), you will need to make sure that the option Enable this consumer key is checked and the option saying Allow access to all APIs is unchecked. This may sound counterintuitive, but this option will give you access to a specific set of APIs and is necessary to access the Tasks API.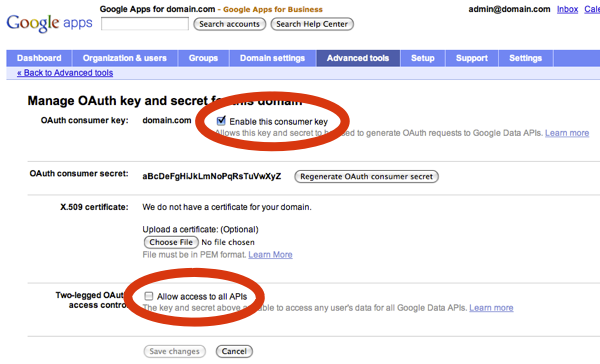
Then you will need to specify which APIs you want your domain OAuth key and secret to have access to. You will be able to do this in the Manage third party OAuth Client access page where you will need to list manually all the scopes that your domain key will have access to. For example for your token to have access to the Google Calendar API and the Google Tasks API use:
e.g.: https://www.google.com/calendar/feeds/, https://www.googleapis.com/auth/tasks
You should then be all set to use 2LO with your Google Apps domain key and secret.
For a more detailed and step-by-step explanation with code samples on how to use 2LO if you are a Google Apps domain admin, I invite you to have a look at the newly published article: Using 2-Legged OAuth with Google Tasks API for Google Apps domain administrators.
 | Nicolas Garnier profile | twitter | events Nicolas joined Google’s Developer Relations in 2008. Since then hes worked on commerce oriented products such as Google Checkout and Google Base. Currently, he is working on Google Apps with a focus on the Google Calendar API, the Google Contacts API, and the Tasks API. Before joining Google, Nicolas worked at Airbus and at the French Space Agency where he built web applications for scientific researchers. |
Want to weigh in on this topic? Discuss on Buzz
Sunday, February 15, 2015
Reading AMSR 2 Data into GeoTIFF raster using gdal grid
The following is not an exhaustive description, but extended notes on how to read AMSR-2 files, which possibly may be of help to others trying to solve a similar task.
For some, the final commented script at our github page may be enough help, the text below tries to explain the most important steps in this script:
The various frequency bands of AMSR-2 have different resolution (see the product specs and the user manual ), we choose the L1R dataset, where the data is already processed to match the geolocation stored in the lat/long band for 89GHz.
Information on the hdf image can be retrieved with gdalinfo:
gdalinfo C:UsersmaxDocumentsGW1AM2_201301311114_050A_L1SGBTBR_1110110.h5
The metadata printed out contains the names of the subchannels, as seen here:
and information about a specific channel can be retrieved by using gdalinfo on exactly this subchannel-name from the metadata:
gdalinfo HDF5:"C:UsersmaxDocumentsGW1AM2_201301311114_050A_L1SGBTBR_1110110.h5"://Brightness_Temperature_(89.0GHz-A,V)
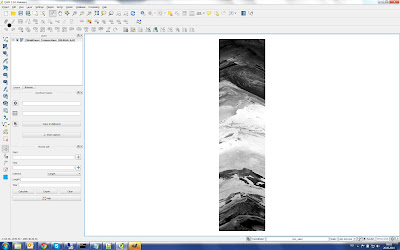
Opening one of the bands in QGIS, the data looks like this (all images in this post are © JAXA EORC ):
In this example we want to convert the data into the NSIDC sea ice raster (EPSG:3411) covering the Arctic areas, using the gdal_grid utility, which creates a regular grid out of a point collection.
Important to know: The 89GHz channel is divided into 89A and 89B, and only both together give the full resolution of about 5km. Each 89 GHz channel has an associated latitude and a longitude raster giving the coordinates for each pixel. For the L1R product, the geolocation information of other frequencies with lower resolution can be derived from the 89A longitude and latitude raster by using only their odd columns.
In the first step, I unzip the gz - zipfiles, then open the hdf file (*.h5). The various frequency bands are stored in Subdatasets, so you open the hdf file with gdal.open(), but then use again gdal.open() for a subdataset (for information on the bands you can run gdalinfo on the *.h5 files:
HDFfile = gdal.Open( rC:UsersmaxDocumentsGW1AM2_201301311114_050A_L1SGBTBR_1110110.h5 )

HDF_bands = HDFfile.GetSubDatasets()

#HDF Subdatasets are opened just as files are opened:
HDF_SubDataset = gdal.Open(HDF_bands[channel][0])
HDF_SubDataset_array = HDF_SubDataset.ReadAsArray()

HDF_Lat89A = gdal.Open(HDF_bands[46][0])
HDF_Lat89A_array = HDF_Lat89A.ReadAsArray()

HDF_Lon89A = gdal.Open(HDF_bands[48][0])
HDF_Lon89A_array = HDF_Lon89A.ReadAsArray()
In the next step, a create a comma-separated file containing longitude, latitude, brightness values for each raster point. This comma separated file is then the input for gdal_grid. I loop through each pixel and write the three values ( longitude, latitude, brightness ) into a csv-file.
So for the 89GHz channel, I write both 89A and 89B to a csv-file:
#Add header line to textfile
textfile = open( AMSRcsv, w)
textfile.write(lon,lat,brightness
)

## Loop through each pixel and write lon/lat/brightness to csv file
for i in range(rows):
    for j in range(cols):
        wgs84=pyproj.Proj("+init=EPSG:4326")
        EPSG3411=pyproj.Proj("+init=EPSG:3411")

        lonA = HDF_Lon89A_array[i,j]
        latA = HDF_Lat89A_array[i,j]

        # lon/lat written to file already projected to EPSG:3411
        (lonA_3411, latA_3411) = pyproj.transform(wgs84, EPSG3411, lonA, latA)
        brightnessA = HDF_Br89AH_array[i,j]* 0.01 #APPLYING SCALING FACTOR!

        lonB = HDF_Lon89B_array[i,j]
        latB = HDF_Lat89B_array[i,j]

        # lon/lat written to file already projected to EPSG:3411
        (lonB_3411, latB_3411) = pyproj.transform(wgs84, EPSG3411, lonB, latB)
        brightnessB = HDF_Br89BH_array[i,j]* 0.01 #APPLYING SCALING FACTOR!

        if 35 < latA < 90:
            textfile.write(str(lonA_3411) + , + str(latA_3411) + , + str(brightnessA) +
)

        if 35 < latB < 90:
            textfile.write(str(lonB_3411) + , + str(latB_3411) + , + str(brightnessB) +
)

textfile.close()
For the lower resolution channels, I use the odd numbers of the 89A long and lat channel:
#Add header line to textfile
textfile = open( AMSRcsv, w)
textfile.write(lon,lat,brightness
)

## Loop through each pixel and write lon/lat/brightness to csv file
for i in range(rows):
    for j in range(cols):
        wgs84=pyproj.Proj("+init=EPSG:4326")
        EPSG3411=pyproj.Proj("+init=EPSG:3411")

        #For low resolution the odd columns of Lon/Lat89 array to be taken!
        lonA = HDF_Lon89A_array[(i) ,(j*2+1)]
        latA = HDF_Lat89A_array[(i) ,(j*2+1)]

        # lon/lat written to file already projected to EPSG:3411
        (lonA_3411, latA_3411) = pyproj.transform(wgs84, EPSG3411, lonA, latA)
        brightnessA = HDF_SubDataset_array[i,j]* 0.01 #APPLYING SCALING FACTOR!

        if 35 < latA < 90:
            textfile.write(str(lonA_3411) + , + str(latA_3411) + , + str(brightnessA) +
)

textfile.close()
Now I can almost run the gdal_grid, but as described at http://www.gdal.org/gdal_grid.html I need to create a xml file describing my comma-separated csv file.
<OGRVRTDataSource>
 <OGRVRTLayer name="GW1AM2_201301010834_032D_L1SGRTBR_1110110_channel89H">
  <SrcDataSource>G:AMSRGW1AM2_201301010834_032D_L1SGRTBR_1110110_channel89H.csv</SrcDataSource>
  <GeometryType>wkbPoint</GeometryType>
  <GeometryField encoding="PointFromColumns" x="lon" y="lat" z="brightness" />
 </OGRVRTLayer>
</OGRVRTDataSource>
This xml file above can be created in a python script in the following manner, some more info here:
root = ET.Element("OGRVRTDataSource")

OGRVRTLayer  = ET.SubElement(root, "OGRVRTLayer")
OGRVRTLayer.set("name", AMSRcsv_shortname)

SrcDataSource = ET.SubElement(OGRVRTLayer, "SrcDataSource")
SrcDataSource.text = AMSRcsv

GeometryType = ET.SubElement(OGRVRTLayer, "GeometryType")
GeometryType.text = "wkbPoint"

GeometryField = ET.SubElement(OGRVRTLayer,"GeometryField")
GeometryField.set("encoding", "PointFromColumns")

GeometryField.set("x", "lon")
GeometryField.set("y", "lat")
GeometryField.set("z", "brightness")

tree = ET.ElementTree(root)
tree.write(AMSRcsv_vrt)
Now we finally can run gdal_grid, either command line: gdal_grid -a_srs EPSG:3411 -a average:radius1=4000:radius2=4000:min_points=1 -txe -3850000 3750000 -tye -5350000 5850000 -outsize 760 1120 -l GW1AM2_201301010834_032D_L1SGRTBR_1110110_channel89H GW1AM2_201301010834_032D_L1SGRTBR_1110110_channel89H.vrt GW1AM2_201301010834_032D_L1SGRTBR_1110110_channel89H.tif
or called from a Python script:
AMSRcsv_shortname =  GW1AM2_201301010834_032D_L1SGRTBR_1110110_channel89H
AMSRcvs_vrt = GW1AM2_201301010834_032D_L1SGRTBR_1110110_channel89H.vrt
AMSR_tif = GW1AM2_201301010834_032D_L1SGRTBR_1110110_channel89H.tif

radius1 = 4000
radius2 = 4000
os.system(gdal_grid -a_srs EPSG:3411 -a average:radius1= + str(radius1) + :radius2= + str(radius2) + :min_points=1 -txe -3850000 3750000 -tye -5350000 5850000 -outsize 760 1120 -l  + AMSRcsv_shortname +    + AMSRcsv_vrt +   + AMSR_tif)
The radius indicates in which distance around a given output raster point the algorithm searches for points falling into the NSIDC raster -- if too small, it will result in empty pixels, if too large there will be too much smoothing since many pixels are averaged into one.
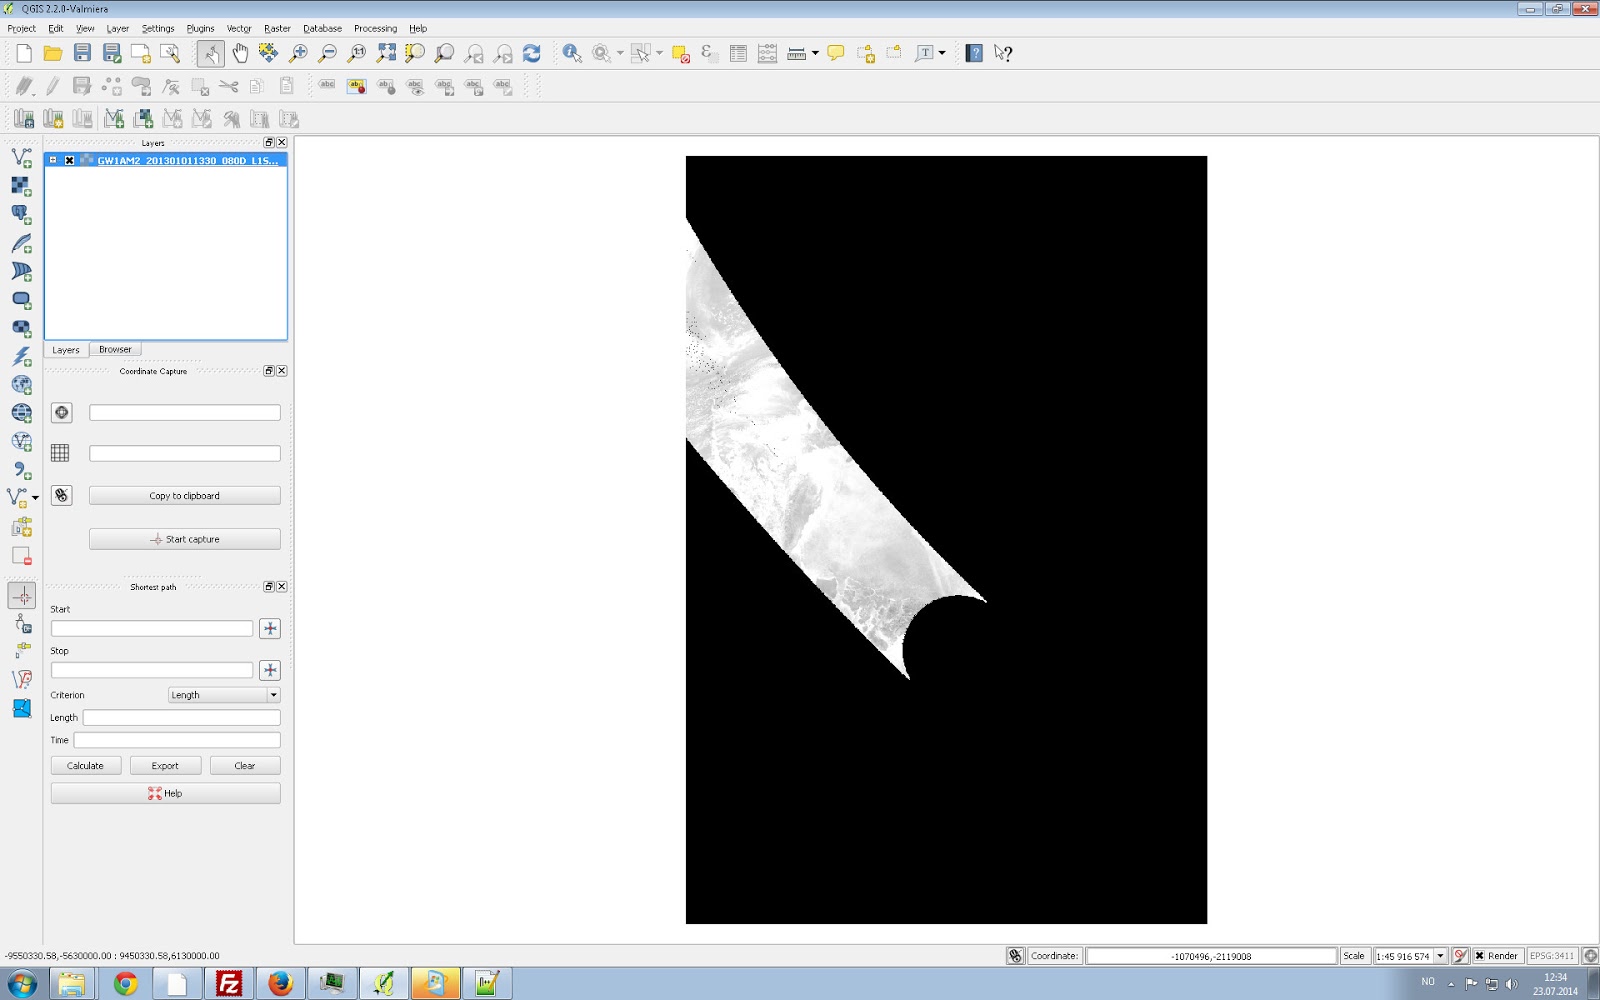
The result is, finally, the part of the swath falling into the NSIDC-raster:
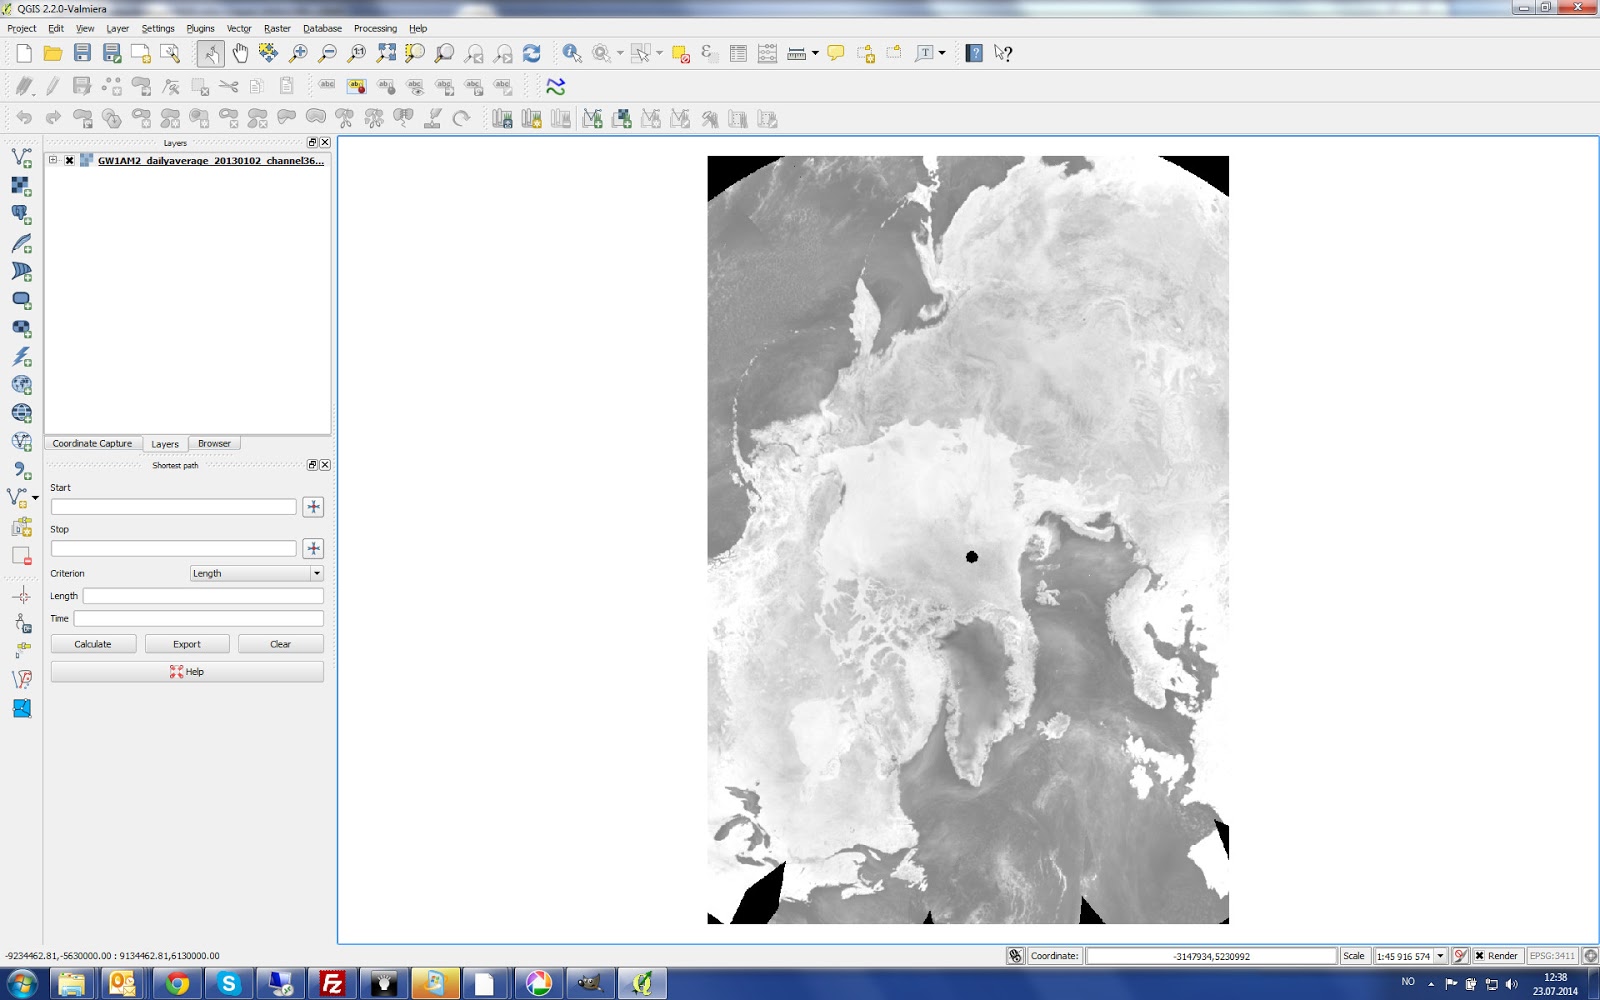
In a final step, I take all of such swaths for one day and average them into a full image of that given day, see the Average Daily function in the script for details (images © JAXA EORC ).
One issue using gdal_grid is its very low performance regarding speed (see this comment ), one 89GHz band takes 10 minutes and a lower resolution band 2 minutes calculation time. This is then about 25 minutes for all channels of one hdf file, and since every day has about 20 files, this means 8 hours for one averaged daily raster. gdal_grid may therefore not always be feasible until the speed issue is improved.
Saturday, February 14, 2015
C program to print following trianlge using character

#include<iostream.h>
#include<conio.h>
void main()
{
clrscr(); //to clear the screen
int i,j,k,n;
cout<<"How many lines?";
cin>>n;
for(i=0;i<n;++i)
{
cout<<"
";
for(j=0;j<i;++j)
cout<<" ";
for(k=n;k>i;--k)
cout<<"*";
}
getch(); //to stop the screen
}
Thursday, February 12, 2015
Using This Website
 |
| Using this website |
In this website, I will show you all of these hacks, how they work and how to perform them. These include but are not limited to - Hacking WiFi Passwords(Any password actually), Shutting down Websites, Creating and Spreading RootKits, Viruses and Trojans, deploying remote keyloggers, administration tools and much more.
Being a (mostly) text-based website, it is meant to be used as a reference. It can be used for gaining knowledge or if you want to perform the various hacking techniques discussed in the website then you need a working Computer system (in some cases with internet). The tutorials are written to be as user-friendly as possible, such that following them and actually doing the steps yourself is a smooth and easy process. This website is mainly aimed towards the beginner looking for a way into the supposedly intangible world of Hacking, but it can be used by experience hackers also as a quick reference tool.
Whether youre on the road or in front of a computer, the tutorials, categorized in an intuitive and easily understandable way- are all available offline.
Ive written these tutorials in the so called "CookBook" fashion, meaning every tutorial is independent of every other tutorials, the user may start and stop anywhere as they please. But I suggest the beginner to go along with the order of difficulty. If ever you feel the need for a heads up or to refresh your knowledge head over to the FYI section, otherwise you may also contact me at anytime.(For my contact information, look into the "More" section)
What prompted me to make this website?
On a seemingly unrelated note, personally I believe that the well known "Nuclear Test Ban Treaty" - adopted by the United Nations is highly unfair. (Basically, this treaty bans the testing of Nuclear weapons). Im not saying we should go about blasting H-Bombs everywhere. I believe it should be replaced with a "Nuclear weapon ban" treaty instead. Right now, the nations who already have well developed nukes can sit happily feeling well protected, while those who dont end up in a position of vulnerability and insecurity. I believe in universal equality. Everyone should be equal. Having a bigger gun than the other guy, means peace for you, not him.
What does all this has to do with making a Hacking Tutorials website?
If guns dont kill people, hacking does no harm either. Although it does have the potential to swing both ways, I believe the pros far outweigh the cons. A little bad for the greater good. We cant control what the bad guys do but we can make sure we are ready to strike back, fight fire with fire and do everything we can to defend ourselves.
This is where this website comes in. The general consensus among the world today is that Hacking is something bad, illegal, almost taboo. Those who do use hacking for bad purposes end up spoiling the name of the entire community. With this website, I hope to popularize and make open to all - The tricks and secrets of the supposedly elusive world of Hacking. With this website, I hope to spawn and provoke cyber security experts throughout the world to join hands to design and implement more secure systems to make our world a little bit safer. With this website, I hope that one day each and every one of the hacking techniques discussed here is no longer viable.
Faith in Humanity __________
Wednesday, February 11, 2015
Program to Create Calculator Using Java Swing
The program to create a simple calculator in Swing is given below. Just try it and if you find any difficulty in understanding the program then mention it in the comment.

import javax.swing.*;
import java.awt.event.*;
class Calc implements ActionListener
{
JFrame f;
JTextField t;
JButton b1,b2,b3,b4,b5,b6,b7,b8,b9,b0,bdiv,bmul,bsub,badd,bdec,beq,bdel,bclr;
static double a=0,b=0,result=0;
static int operator=0;
Calc()
{
f=new JFrame("Calculator");
t=new JTextField();
b1=new JButton("1");
b2=new JButton("2");
b3=new JButton("3");
b4=new JButton("4");
b5=new JButton("5");
b6=new JButton("6");
b7=new JButton("7");
b8=new JButton("8");
b9=new JButton("9");
b0=new JButton("0");
bdiv=new JButton("/");
bmul=new JButton("*");
bsub=new JButton("-");
badd=new JButton("+");
bdec=new JButton(".");
beq=new JButton("=");
bdel=new JButton("Delete");
bclr=new JButton("Clear");
t.setBounds(30,40,280,30);
b7.setBounds(40,100,50,40);
b8.setBounds(110,100,50,40);
b9.setBounds(180,100,50,40);
bdiv.setBounds(250,100,50,40);
b4.setBounds(40,170,50,40);
b5.setBounds(110,170,50,40);
b6.setBounds(180,170,50,40);
bmul.setBounds(250,170,50,40);
b1.setBounds(40,240,50,40);
b2.setBounds(110,240,50,40);
b3.setBounds(180,240,50,40);
bsub.setBounds(250,240,50,40);
bdec.setBounds(40,310,50,40);
b0.setBounds(110,310,50,40);
beq.setBounds(180,310,50,40);
badd.setBounds(250,310,50,40);
bdel.setBounds(60,380,100,40);
bclr.setBounds(180,380,100,40);
f.add(t);
f.add(b7);
f.add(b8);
f.add(b9);
f.add(bdiv);
f.add(b4);
f.add(b5);
f.add(b6);
f.add(bmul);
f.add(b1);
f.add(b2);
f.add(b3);
f.add(bsub);
f.add(bdec);
f.add(b0);
f.add(beq);
f.add(badd);
f.add(bdel);
f.add(bclr);
f.setLayout(null);
f.setVisible(true);
f.setSize(350,500);
f.setDefaultCloseOperation(JFrame.EXIT_ON_CLOSE);
f.setResizable(false);
b1.addActionListener(this);
b2.addActionListener(this);
b3.addActionListener(this);
b4.addActionListener(this);
b5.addActionListener(this);
b6.addActionListener(this);
b7.addActionListener(this);
b8.addActionListener(this);
b9.addActionListener(this);
b0.addActionListener(this);
badd.addActionListener(this);
bdiv.addActionListener(this);
bmul.addActionListener(this);
bsub.addActionListener(this);
bdec.addActionListener(this);
beq.addActionListener(this);
bdel.addActionListener(this);
bclr.addActionListener(this);
}
public void actionPerformed(ActionEvent e)
{
if(e.getSource()==b1)
t.setText(t.getText().concat("1"));
if(e.getSource()==b2)
t.setText(t.getText().concat("2"));
if(e.getSource()==b3)
t.setText(t.getText().concat("3"));
if(e.getSource()==b4)
t.setText(t.getText().concat("4"));
if(e.getSource()==b5)
t.setText(t.getText().concat("5"));
if(e.getSource()==b6)
t.setText(t.getText().concat("6"));
if(e.getSource()==b7)
t.setText(t.getText().concat("7"));
if(e.getSource()==b8)
t.setText(t.getText().concat("8"));
if(e.getSource()==b9)
t.setText(t.getText().concat("9"));
if(e.getSource()==b0)
t.setText(t.getText().concat("0"));
if(e.getSource()==bdec)
t.setText(t.getText().concat("."));
if(e.getSource()==badd)
{
a=Double.parseDouble(t.getText());
operator=1;
t.setText("");
}
if(e.getSource()==bsub)
{
a=Double.parseDouble(t.getText());
operator=2;
t.setText("");
}
if(e.getSource()==bmul)
{
a=Double.parseDouble(t.getText());
operator=3;
t.setText("");
}
if(e.getSource()==bdiv)
{
a=Double.parseDouble(t.getText());
operator=4;
t.setText("");
}
if(e.getSource()==beq)
{
b=Double.parseDouble(t.getText());
switch(operator)
{
case 1: result=a+b;
break;
case 2: result=a-b;
break;
case 3: result=a*b;
break;
case 4: result=a/b;
break;
default: result=0;
}
t.setText(""+result);
}
if(e.getSource()==bclr)
t.setText("");
if(e.getSource()==bdel)
{
String s=t.getText();
t.setText("");
for(int i=0;i<s.length()-1;i++)
t.setText(t.getText()+s.charAt(i));
}
}
public static void main(String...s)
{
new Calc();
}
}
C Program for Addition and Multiplication of Polynomial Using Arrays or Linked List
Polynomial addition, multiplication (8th degree polynomials) using arrays
#include<math.h>
#include<stdio.h>
#include<conio.h>
#define MAX 17
void init(int p[]);
void read(int p[]);
void print(int p[]);
void add(int p1[],int p2[],int p3[]);
void multiply(int p1[],int p2[],int p3[]);
/*Polynomial is stored in an array, p[i] gives coefficient of x^i .
a polynomial 3x^2 + 12x^4 will be represented as (0,0,3,0,12,0,0,....)
*/
void main()
{
int p1[MAX],p2[MAX],p3[MAX];
int option;
do
{
printf("
1 : create 1st polynomial");
printf("
2 : create 2nd polynomial");
printf("
3 : Add polynomials");
printf("
4 : Multiply polynomials");
printf("
5 : Quit");
printf("
Enter your choice :");
scanf("%d",&option);
switch(option)
{
case 1:read(p1);break;
case 2:read(p2);break;
case 3:add(p1,p2,p3);
printf("
1st polynomial -> ");
print(p1);
printf("
2nd polynomial -> ");
print(p2);
printf("
Sum = ");
print(p3);
break;
case 4:multiply(p1,p2,p3);
printf("
1st polynomial -> ");
print(p1);
printf("
2nd polynomial -> ");
print(p2);
printf("
Product = ");
print(p3);
break;
}
}while(option!=5);
}
void read(int p[])
{
int n, i, power,coeff;
init(p);
printf("
Enter number of terms :");
scanf("%d",&n);
/* read n terms */
for (i=0;i<n;i++)
{ printf("
enter a term(power coeff.)");
scanf("%d%d",&power,&coeff);
p[power]=coeff;
}
}
void print(int p[])
{
int i;
for(i=0;i<MAX;i++)
if(p[i]!=0)
printf("%dX^%d ",p[i],i);
}
void add(int p1[], int p2[], int p3[])
{
int i;
for(i=0;i<MAX;i++)
p3[i]=p1[i]+p2[i];
}
void multiply(int p1[], int p2[], int p3[])
{
int i,j;
init(p3);
for(i=0;i<MAX;i++)
for(j=0;j<MAX;j++)
p3[i+j]=p3[i+j]+p1[i]*p2[j];
}
void init(int p[])
{
int i;
for(i=0;i<MAX;i++)
p[i]=0;
}
Also Read: C Program for Addition of two Sparse Matrices
Also Read: C Program for Array Representation of Stack [Push, Pop and Display]
Polynomial addition, multiplication (8th degree polynomials) using linked list
#include<math.h>
#include<stdio.h>
#include<conio.h>
#define MAX 17
typedef struct node
{
int coeff;
struct node *next;
}node;
node * init();
void read(node *h1);
void print(node *h1);
node * add(node *h1,node *h2);
node * multiply(node *h1,node *h2);
/*Polynomial is stored in a linked list, ith node gives coefficient of x^i .
a polynomial 3x^2 + 12x^4 will be represented as (0,0,3,0,12,0,0,....)
*/
void main()
{
node *h1=NULL,*h2=NULL,*h3=NULL;
int option;
do
{
printf("
1 : create 1st polynomial");
1 : create 1st polynomial");
printf("
2 : create 2nd polynomial");
2 : create 2nd polynomial");
printf("
3 : Add polynomials");
3 : Add polynomials");
printf("
4 : Multiply polynomials");
4 : Multiply polynomials");
printf("
5 : Quit");
5 : Quit");
printf("
Enter your choice :");
Enter your choice :");
scanf("%d",&option);
switch(option)
{
case 1:h1=init();read(h1);break;
case 2:h2=init();read(h2);break;
case 3:h3=add(h1,h2);
printf("
1st polynomial -> ");
1st polynomial -> ");
print(h1);
printf("
2nd polynomial -> ");
2nd polynomial -> ");
print(h2);
printf("
Sum = ");
Sum = ");
print(h3);
break;
case 4:h3=multiply(h1,h2);
printf("
1st polynomial -> ");
1st polynomial -> ");
print(h1);
printf("
2nd polynomial -> ");
2nd polynomial -> ");
print(h2);
printf("
Product = ");
Product = ");
print(h3);
break;
}
}while(option!=5);
}
void read(node *h)
{
int n,i,j,power,coeff;
node *p;
p=init();
printf("
Enter number of terms :");
Enter number of terms :");
scanf("%d",&n);
/* read n terms */
for (i=0;i<n;i++)
{ printf("
enter a term(power coeff.)");
enter a term(power coeff.)");
scanf("%d%d",&power,&coeff);
for(p=h,j=0;j<power;j++)
p=p->next;
p->coeff=coeff;
}
}
void print(node *p)
{
int i;
for(i=0;p!=NULL;i++,p=p->next)
if(p->coeff!=0)
printf("%dX^%d ",p->coeff,i);
}
node * add(node *h1, node *h2)
{
node *h3,*p;
h3=init();
p=h3;
while(h1!=NULL)
{
h3->coeff=h1->coeff+h2->coeff;
h1=h1->next;
h2=h2->next;
h3=h3->next;
}
return(p);
}
node * multiply(node *h1, node *h2)
{
node *h3,*p,*q,*r;
int i,j,k,coeff,power;
h3=init();
for(p=h1,i=0;p!=NULL;p=p->next,i++)
for(q=h2,j=0;q!=NULL;q=q->next,j++)
{
coeff=p->coeff * q->coeff;
power=i+j;
for(r=h3,k=0;k<power;k++)
r=r->next;
r->coeff=r->coeff+coeff;
}
return(h3);
}
node * init()
{
int i;
node *h=NULL,*p;
for(i=0;i<MAX;i++)
{
p=(node*)malloc(sizeof(node));
p->next=h;
p->coeff=0;
h=p;
}
return(h);
}

Monday, February 2, 2015
Android Game Development Creating Android Games Using Flash CS5
Want to try out the entire Lynda training library of 900+ courses for FREE?
[SIGN UP FOR A FREE 10-DAY PASS TO LYNDA.COM TODAY]
This course also goes beyond game functionality and shows you how to incorporate the use of mobile device capabilities such as the accelerometer and gestures to control graphics, and the hardware keys to activate menus. Youll also learn how to optimize your game so that it plays well on mobile devices. Once youve designed and created your own Android game using the skills youve learned from this course, youll probably want to distribute it through the Android Market; this course will teach you that as well.
This training course consists of a total of 3 hours and 35 minutes worth of video divided into different chapters. Youll be viewing clearly presented video recordings of the author showing you how to create the Android game. No need to go through long pages of text, and best of all, youll see exactly whats happening on the authors screen so that you can easily follow along.
Here are a couple of sample videos from the course that will give you a better idea of the kind of game that you will be creating:
Introduction - Flash Professional CS5: Creating a Simple Game for Android Devices
Adding code snippets - Flash CS5: Creating a Simple Game for Android Devices
This video talks about Flash CS5s handy feature known as code snippets. Code snippets are pre-made customizable code that you can easily add to your project.Adding elements of randomness and chance to your game - Flash Professional CS5: Creating a Simple Game for Android Devices
This video will show you how to create an element of chance when generating the number of enemies that come up in your game. Youll also learn how to randomize the movement of these enemy characters.Using the accelerometer to enable the user to move the game character by tilting the device - Flash Professional CS5: Creating a Simple Game for Android Devices
This video will show you how to use the AS3 Accelerometer class in order to take advantage of an Android devices accelerometer sensor, which detects if the device is being tilted by the user, so that it can be used to make the character move.If you liked the sample videos, then go ahead and sign up for a Lynda.com membership to view the entire course. For $25, you get 1-month unlimited access to not just this training course, but all of Lynda.coms 900+ training courses. No long-term commitment required. You can cancel your membership at any time. And as a special promotion for visitors of this site, you can get a Free 10 day pass to lynda.com. Go ahead and see for yourself what a great learning resource this website is.
Get a [Free 10 day pass to lynda.com]
Heres a more detailed outline of the course:
Title: Flash Professional CS5: Creating a Simple Game for Android Devices
Author: Paul Trani
Duration: 3hrs 35mins
Date of Release: 15 February 2011
Chapter 1: Introduction to Mobile
Understanding the user
Flash content on Android devices
Chapter 2: Mobile Game Setup
Reviewing the game
Creating a file in Device Central
Reviewing the game structure
Adding code snippets
Chapter 3: Basic Game Movement
Animating the intro screen
Moving the player
Adding enemies
Adding movement
Adding chance and randomness
Chapter 4: Advanced Interactivity
Adding lasers
Detecting collisions
Adding explosions
Removing assets from the stage
Adding audio
Chapter 5: Scoring
Adding scoring and levels
Subtracting lives and ending the game
Creating a results screen
Displaying the score
Saving and loading game results
Chapter 6: Mobile-Specific Functionality
Detecting movement with the Accelerometer
Using the swipe gesture
Using hardware keys
Chapter 7: Optimizing for Mobile Devices
Handling exits and idle mode
Handling activation and deactivation
Optimizing graphics
Optimizing ActionScript
Chapter 8: Publishing
Creating the application files
Creating the app (Mac)
Creating the app (PC)
Publishing to an Android device (Mac)
Publishing to an Android device (PC)
Chapter 9: Uploading to the Android Market
Uploading to the Android market
Downloading from the Android market
[Free 10 day pass to lynda.com]
So if you want to start learning about Android game development so you can start creating your own Android games, then sign up for Lynda.coms Flash Professional CS5: Creating a Simple Game for Android Devices training course.
Subscribe to:
Comments (Atom)