Sunday, January 25, 2015
Android beginner tutorial Part 47 TimePickerDialog
TimePickerDialog is similar to DatePickerDialog in terms of usage, appearance and implementation.
First we need to add a button in the activity layout:
<LinearLayout xmlns:android="http://schemas.android.com/apk/res/android"
    xmlns:tools="http://schemas.android.com/tools"
    android:layout_width="match_parent"
    android:layout_height="match_parent"
    android:orientation="vertical"
    tools:context=".MainActivity" >

<Button
    android:id="@+id/testButton"
    android:layout_width="fill_parent"
    android:layout_height="wrap_content"
    android:text="Call a TimePickerDialog"
    />

</LinearLayout>
New go to MainActivity.java class. Declare a TimePickerDialog instance:
public TimePickerDialog myDialog;
In the onCreate() function add a click listener for the button.
In the onClick() function handler, firstly create a Calendar instance. Set its value to Calendar.getInstance(). This will be used to set the values of the time picker to current time when the dialog is invoked.
Then set the value of myDialog object to a new TimePickerDialog. It has 5 parameters. Set first ones value to the current context (MainActivity.this), the second one to a OnTimeSetListener object (more on this later), third and floor values to current hour and minutes. Use the calendar objects get() method to do that.
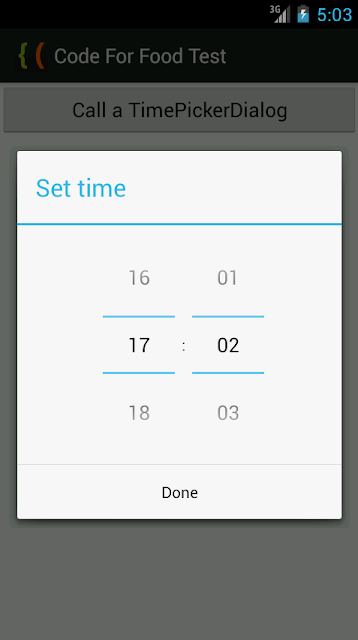
The TimePickerDialog widget can display the time picking mechanism in 2 formats - 12-hour (AM and PM) and 24-hour. If you want to display it in 24-hour format, set the fifth parameters value of the TimePickerDialog constructor to true.
Because were using 24-h format in this tutorial, well set the third parameters value to calendar.get(Calendar.HOUR_OF_DAY). If we used 12-h, wed set it to calendar.get(Calendar.HOUR).
The fourth parameter is set to calendar.get(Calendar.MINUTE).
Inside the OnTimeSetListener() object we have an onTimeSet() method that receives 3 parameters - view, hourOfDay and minute. Display those in a toast.
After that, show the dialog.
@Override
protected void onCreate(Bundle savedInstanceState) {
super.onCreate(savedInstanceState);
setRequestedOrientation(ActivityInfo.SCREEN_ORIENTATION_PORTRAIT);
setContentView(R.layout.activity_main);

Button button = (Button)findViewById(R.id.testButton);

button.setOnClickListener(new View.OnClickListener() {

@Override
public void onClick(View v) {
Calendar calendar = Calendar.getInstance();
myDialog = new TimePickerDialog(MainActivity.this, new OnTimeSetListener() {

@Override
public void onTimeSet(TimePicker view, int hourOfDay, int minute) {
Toast toast = Toast.makeText(MainActivity.this, hourOfDay + ":" + minute, Toast.LENGTH_SHORT);
toast.show();
}
}, calendar.get(Calendar.HOUR_OF_DAY), calendar.get(Calendar.MINUTE), true);
myDialog.show();
}
});

}
Full code:
package com.kircode.codeforfood_test;

import java.util.Calendar;

import android.app.Activity;
import android.app.TimePickerDialog;
import android.app.TimePickerDialog.OnTimeSetListener;
import android.content.pm.ActivityInfo;
import android.os.Bundle;
import android.view.Menu;
import android.view.View;
import android.widget.Button;
import android.widget.TimePicker;
import android.widget.Toast;

public class MainActivity extends Activity{

public TimePickerDialog myDialog;

@Override
protected void onCreate(Bundle savedInstanceState) {
super.onCreate(savedInstanceState);
setRequestedOrientation(ActivityInfo.SCREEN_ORIENTATION_PORTRAIT);
setContentView(R.layout.activity_main);

Button button = (Button)findViewById(R.id.testButton);

button.setOnClickListener(new View.OnClickListener() {

@Override
public void onClick(View v) {
Calendar calendar = Calendar.getInstance();
myDialog = new TimePickerDialog(MainActivity.this, new OnTimeSetListener() {

@Override
public void onTimeSet(TimePicker view, int hourOfDay, int minute) {
Toast toast = Toast.makeText(MainActivity.this, hourOfDay + ":" + minute, Toast.LENGTH_SHORT);
toast.show();
}
}, calendar.get(Calendar.HOUR_OF_DAY), calendar.get(Calendar.MINUTE), true);
myDialog.show();
}
});

}

@Override
public boolean onCreateOptionsMenu(Menu menu) {
// Inflate the menu; this adds items to the action bar if it is present.
getMenuInflater().inflate(R.menu.activity_main, menu);
return true;
}

}
The results look something like this:
Thanks for reading!
Subscribe to:
Post Comments (Atom)
No comments:
Post a Comment
Note: Only a member of this blog may post a comment.