Showing posts with label beginner. Show all posts
Showing posts with label beginner. Show all posts
Sunday, February 1, 2015
Android beginner tutorial Part 11 TextView customization
As I said in the previous tutorial, the class has multiple methods and attributes. Besides android:text attribute, there are a few other that are considered one of the most commonly set attributes. These are android:textSize, android:textStyle and android:textColor.
The android:textSize attribute sets the size of the displayed text. The possible units of measurement here are:
- px - pixels
- dp - density-independent pixels
- sp - scale-independent pixels
- in - inches
- pt - points (1/72 of an inch)
- mm - millimeters
Usually the "sp" unit is used, which displays fonts more correctly.
Example:
android:textSize="32sp";
The next attribute, android:textStyle, sets the style of the text and has 3 possible values - normal, bold and italic.
Example:
android:textStyle="bold";
The android:textColor attribute sets the color of your text. It has 4 possible value formats:
- #RGB
- #ARGB
- #RRGGBB
- #AARRGGBB
Where R - red, G - green, B - blue, A - alpha channel. The alpha channel value ranges from 0 to 1.
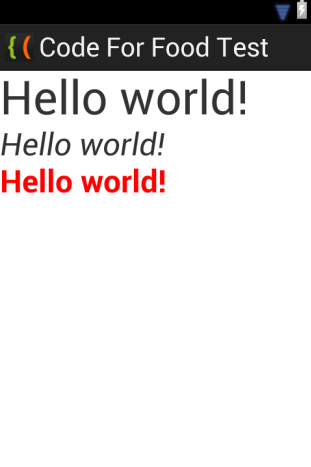
Now lets create a simple example, which displays the same text in 3 different TextViews.
Open our test Android project, go to res/values/strings.xml file and edit it to add a string that holds a "Hello world!" text, with an id "helloText":
<?xml version="1.0" encoding="utf-8"?>
<resources>

    <string name="app_name">Code For Food Test</string>
    <string name="helloText">Hello world!</string>
    <string name="menu_settings">Settings</string>

</resources>
Now go to activity_main.xml in res/layout/ to add 3 TextViews to the Activity:
<LinearLayout xmlns:android="http://schemas.android.com/apk/res/android"
    xmlns:tools="http://schemas.android.com/tools"
    android:layout_width="match_parent"
    android:layout_height="match_parent"
    android:orientation="vertical"
    tools:context=".MainActivity" >

    <TextView
        android:layout_width="wrap_content"
        android:layout_height="wrap_content"
        android:text="@string/helloText"
        android:textSize="48sp"/>

    <TextView
        android:layout_width="wrap_content"
        android:layout_height="wrap_content"
        android:text="@string/helloText"
        android:textSize="32sp"
        android:textStyle="italic"/>

    <TextView
        android:layout_width="wrap_content"
        android:layout_height="wrap_content"
        android:text="@string/helloText"
        android:textSize="32sp"
        android:textStyle="bold"
        android:textColor="#f00"
        />

</LinearLayout>
The results:
Thats all for today.
Thanks for reading!

Friday, January 30, 2015
Android beginner tutorial Part 3 Android project structure
After creating your Android project in Eclipse, youll see the project file browser in the left side of the screen. Here is what mine looks like:

The project structure may differ if your API version is different, but it still should be somewhat similar.
Lets start by exploring the res directory. This is a resource folder, which contains the resources that youll be using in your application, such as images, strings, animations and so on. The ADT plugin generates and adds some folders and files inside the res directory after creating the project.
The res/drawable-hdpi, res/drawable-ldpi, res/drawable-mdpi and res/drawable-xhdpi folders are used to store images, that are used in your application. The reason for splitting the images in multiple folders is the different screen resolutions for devices. Youll find different versions of the launcher icon youve set while creating the project in all of these folders.
The next folder is res/layout - it contains XML files that represent layout of the Activities in your application.
The res/menu folder stores XML files for defining application menus, which are used for different purposes, for example, the options menu.
The res/values folder stores values that are used in your application. These can be strings, arrays, styles and more.
You can see res/values-v11 and res/values-v14 folders in my screenshot above, which contain styles.xml. These are the themes that used instead of the default styles.xml for API version 11 and API version 14.
These are not the only folders that can be contained within the res folder. There are a few more pre-defined directories that, if not generated automatically, can be created manually. It should be noted that Android is rather strict about the resource directory and most of the folder names are pre-defined. For example, Android doesnt support folders inside other folders here.
Thats the general information about the items in the resource directory. We will learn their purpose and usage in details as we work on our application.
The next file we should take a look at is the MainActivity.java file inside the package folder inside src. If you open it, the contents look something like this:

This is basically a Java class, which contains the functionality code for the main Activity. So, XML is used to set the layout for the activity, and this Java class is used to add functionality. Its similar to Flex - the application layout is defined in a MXML file, and the code is in AS3 classes.
We wont delve into the code right now, lets instead check out one more item in the project folder - AndroidManifest.xml.
This is basically the configuration file - it declares the general information about the application (version, package...), components of the application, lists the libraries that are used, application permissions, etc. Its comparable to the descriptor.xml file in Adobe AIR projects.
You can edit this file manually as an XML file, or using the Manifest Editor that Eclipse offers. The basic important info is filled out automatically when you create a project. You can edit them here any time.
And those are the essentials that you need to know about the structure of an Android project folder.
Well learn how to run and debug applications next time.
Thanks for reading!
Tuesday, January 27, 2015
Android beginner tutorial Part 19 ToggleButton widget
A ToggleButton widget is similar to a CheckBox. It acts like a switch - it can be turned on or off. The only thing different from a CheckBox is the appearance. Instead with a box that can be checked, its a regular button with a label, plus a little LED indicator under the text that changes color when the button is toggled.
The ToggleButton widget has default text values - ON and OFF. They can be set to custom values using android:textOn and android:textOff properties or setTextOn() and setTextOff() methods.
In the example below, I create a simple Activity layout in activity_main.xml that contains a ToggleButton and a text underneath. Set the ids as shown below:
<LinearLayout xmlns:android="http://schemas.android.com/apk/res/android"
    xmlns:tools="http://schemas.android.com/tools"
    android:layout_width="match_parent"
    android:layout_height="match_parent"
    android:orientation="vertical"
    tools:context=".MainActivity" >

    <ToggleButton
        android:layout_width="match_parent"
        android:layout_height="wrap_content"
        android:id="@+id/togglebutton"/>
    <TextView
        android:layout_width="match_parent"
        android:layout_height="wrap_content"
        android:id="@+id/message"
        />

</LinearLayout>
Well need to go to strings.xml and define 2 values toggle_on and toggle_off, which will be displayed in the text field when the toggle button changes its state.
<?xml version="1.0" encoding="utf-8"?>
<resources>

    <string name="app_name">Code For Food Test</string>
    <string name="toggle_on">The switch is On</string>
    <string name="toggle_off">The switch is Off</string>
    <string name="menu_settings">Settings</string>

</resources>
Now go to MainActivity.java class. Were going to update the code from the previous tutorial to match our new needs.
Were going to keep the OnCheckedChangeListener class implementation, the onCheckedChanged() function and most of the other code. Were going to declare a ToggleButton "toggle" instead of a CheckBox "check", though. Were also declaring a new TextView "message", which refers to the "message" object in the layout.
Heres the code:
package com.kircode.codeforfood_test;

import android.app.Activity;
import android.os.Bundle;
import android.view.Menu;
import android.widget.CompoundButton;
import android.widget.CompoundButton.OnCheckedChangeListener;
import android.widget.TextView;
import android.widget.ToggleButton;

public class MainActivity extends Activity implements OnCheckedChangeListener{

public ToggleButton toggle;
public TextView message;

@Override
protected void onCreate(Bundle savedInstanceState) {
super.onCreate(savedInstanceState);
setContentView(R.layout.activity_main);

toggle = (ToggleButton)findViewById(R.id.togglebutton);
toggle.setOnCheckedChangeListener(this);

message = (TextView)findViewById(R.id.message);
}

public void onCheckedChanged(CompoundButton buttonView, boolean isChecked){
if(isChecked){
message.setText(R.string.toggle_on);
}else{
message.setText(R.string.toggle_off);
}
}

@Override
public boolean onCreateOptionsMenu(Menu menu) {
// Inflate the menu; this adds items to the action bar if it is present.
getMenuInflater().inflate(R.menu.activity_main, menu);
return true;
}

}
As you can see, the code is not too different from the previous tutorial, where we handle CheckBox events.
That will be all for today.
Thanks for reading!
Android beginner tutorial Part 71 Adding contacts to the database
We are going to add a menu item that launches a dialog window, which lets us add a new record to the table.
First of all, lets create a layout xml for the dialog window. It shuold include 2 EditText objects - set their ids to inp_name and inp_phone and set their inputTypes to textPersonName and phone.
<?xml version="1.0" encoding="utf-8"?>
<LinearLayout xmlns:android="http://schemas.android.com/apk/res/android"
    android:orientation="vertical"
    android:layout_width="wrap_content"
    android:layout_height="wrap_content">
    <EditText
        android:id="@+id/inp_name"
        android:inputType="textPersonName"
        android:layout_width="match_parent"
        android:layout_height="wrap_content"
        android:layout_marginTop="16dp"
        android:layout_marginLeft="4dp"
        android:layout_marginRight="4dp"
        android:layout_marginBottom="4dp"
        android:hint="Name" />
    <EditText
        android:id="@+id/inp_phone"
        android:inputType="phone"
        android:layout_width="match_parent"
        android:layout_height="wrap_content"
        android:layout_marginTop="4dp"
        android:layout_marginLeft="4dp"
        android:layout_marginRight="4dp"
        android:layout_marginBottom="16dp"
        android:fontFamily="sans-serif"
        android:hint="Phone"/>
</LinearLayout>
Now return to MainActivity.java class.
Take the code that loads data from the database to update the ListViews contents and turn it into a function:
public void updateList(){
String[] columns = new String[] {myDbHelper._ID, myDbHelper.NAME, myDbHelper.PHONE};
ContentResolver resolver = getContentResolver();
Cursor cursor = resolver.query(CONTENT_URI, columns, null, null, null);

final ListAdapter adapter = new SimpleCursorAdapter(this, R.layout.customrow, cursor, new String[] {myDbHelper.NAME, myDbHelper.PHONE}, new int[] {R.id.t_name, R.id.t_phone}, 0);
Toast.makeText(this, "Rows found: " + adapter.getCount(), Toast.LENGTH_SHORT).show();
ListView list = (ListView)findViewById(R.id.contactList);
list.setAdapter(adapter);
}
Now declare an ID for the Add button in the options:
private static final int IDM_ADD = 101;
Now declare 2 variables for the dialog that were going to create. The variables are AlertDialog and View class instances:
private AlertDialog addDialog;
private View alertView;
Create a onCreateOptionsMenu() function and add an "Add" item to the menu in it:
@Override
public boolean onCreateOptionsMenu(Menu menu){
menu.add(Menu.NONE, IDM_ADD, Menu.NONE, "Add");
return(super.onCreateOptionsMenu(menu));
}
When the item is selected, call a function called dialogAdd():
@Override
public boolean onOptionsItemSelected(MenuItem item){
switch(item.getItemId()){
case IDM_ADD:
dialogAdd();
break;
}
return(super.onOptionsItemSelected(item));
}
Now go to the onCreate() function. Firstly we call the updateList() method to load the data:
// Load from database

updateList();
Then we create the dialog window using an AlertDialog.Builder object and add a click listener to its "OK" button. When the button is pressed, we Toast the values written by the user (for debugging reasons), and then insert() it into the database using the ContentResolver object:
// Create "Add contact" dialog

AlertDialog.Builder builder = new AlertDialog.Builder(MainActivity.this);

LayoutInflater inflater = LayoutInflater.from(getApplicationContext());
alertView = inflater.inflate(R.layout.add_window, null);
builder.setView(alertView);

builder.setTitle("Add contact");

builder.setPositiveButton("OK", new DialogInterface.OnClickListener() {

@Override
public void onClick(DialogInterface dialog, int which) {
EditText t_name = (EditText)alertView.findViewById(R.id.inp_name);
EditText t_phone = (EditText)alertView.findViewById(R.id.inp_phone);
String new_name = t_name.getText().toString();
String new_phone = t_phone.getText().toString();
Toast toast = Toast.makeText(getApplicationContext(), "Name: " + new_name + ", Phone: " + new_phone, Toast.LENGTH_SHORT);
toast.show();
ContentValues values = new ContentValues();
values.put(myDbHelper.NAME, new_name);
values.put(myDbHelper.PHONE, new_phone);
getContentResolver().insert(CONTENT_URI, values);
updateList();
}
});

builder.setCancelable(true);
addDialog = builder.create();
Full code looks like this:
package com.kircode.codeforfood_test;

import android.app.Activity;
import android.app.AlertDialog;
import android.content.ContentResolver;
import android.content.ContentValues;
import android.content.DialogInterface;
import android.database.Cursor;
import android.net.Uri;
import android.os.Bundle;
import android.support.v4.widget.SimpleCursorAdapter;
import android.view.LayoutInflater;
import android.view.Menu;
import android.view.MenuItem;
import android.view.View;
import android.widget.EditText;
import android.widget.ListAdapter;
import android.widget.ListView;
import android.widget.Toast;

public class MainActivity extends Activity{

private static final Uri CONTENT_URI = Uri.parse("content://com.kircode.codeforfood_test.mycontentprovider/contacts");
private static final int IDM_ADD = 101;

private AlertDialog addDialog;
private View alertView;

@Override
protected void onCreate(Bundle savedInstanceState) {
super.onCreate(savedInstanceState);
setContentView(R.layout.activity_main);

// Load from database

updateList();

// Create "Add contact" dialog

AlertDialog.Builder builder = new AlertDialog.Builder(MainActivity.this);

LayoutInflater inflater = LayoutInflater.from(getApplicationContext());
alertView = inflater.inflate(R.layout.add_window, null);
builder.setView(alertView);

builder.setTitle("Add contact");

builder.setPositiveButton("OK", new DialogInterface.OnClickListener() {

@Override
public void onClick(DialogInterface dialog, int which) {
EditText t_name = (EditText)alertView.findViewById(R.id.inp_name);
EditText t_phone = (EditText)alertView.findViewById(R.id.inp_phone);
String new_name = t_name.getText().toString();
String new_phone = t_phone.getText().toString();
Toast toast = Toast.makeText(getApplicationContext(), "Name: " + new_name + ", Phone: " + new_phone, Toast.LENGTH_SHORT);
toast.show();
ContentValues values = new ContentValues();
values.put(myDbHelper.NAME, new_name);
values.put(myDbHelper.PHONE, new_phone);
getContentResolver().insert(CONTENT_URI, values);
updateList();
}
});

builder.setCancelable(true);
addDialog = builder.create();
}

@Override
public boolean onCreateOptionsMenu(Menu menu){
menu.add(Menu.NONE, IDM_ADD, Menu.NONE, "Add");
return(super.onCreateOptionsMenu(menu));
}

@Override
public boolean onOptionsItemSelected(MenuItem item){
switch(item.getItemId()){
case IDM_ADD:
dialogAdd();
break;
}
return(super.onOptionsItemSelected(item));
}

public void dialogAdd(){
addDialog.show();
}

public void updateList(){
String[] columns = new String[] {myDbHelper._ID, myDbHelper.NAME, myDbHelper.PHONE};
ContentResolver resolver = getContentResolver();
Cursor cursor = resolver.query(CONTENT_URI, columns, null, null, null);

final ListAdapter adapter = new SimpleCursorAdapter(this, R.layout.customrow, cursor, new String[] {myDbHelper.NAME, myDbHelper.PHONE}, new int[] {R.id.t_name, R.id.t_phone}, 0);
Toast.makeText(this, "Rows found: " + adapter.getCount(), Toast.LENGTH_SHORT).show();
ListView list = (ListView)findViewById(R.id.contactList);
list.setAdapter(adapter);
}

}
Now we can add new items to the database and the list updates when that is done.
Thats all for today.
Thanks for reading!
Sunday, January 25, 2015
Android beginner tutorial Part 47 TimePickerDialog
TimePickerDialog is similar to DatePickerDialog in terms of usage, appearance and implementation.
First we need to add a button in the activity layout:
<LinearLayout xmlns:android="http://schemas.android.com/apk/res/android"
    xmlns:tools="http://schemas.android.com/tools"
    android:layout_width="match_parent"
    android:layout_height="match_parent"
    android:orientation="vertical"
    tools:context=".MainActivity" >

<Button
    android:id="@+id/testButton"
    android:layout_width="fill_parent"
    android:layout_height="wrap_content"
    android:text="Call a TimePickerDialog"
    />

</LinearLayout>
New go to MainActivity.java class. Declare a TimePickerDialog instance:
public TimePickerDialog myDialog;
In the onCreate() function add a click listener for the button.
In the onClick() function handler, firstly create a Calendar instance. Set its value to Calendar.getInstance(). This will be used to set the values of the time picker to current time when the dialog is invoked.
Then set the value of myDialog object to a new TimePickerDialog. It has 5 parameters. Set first ones value to the current context (MainActivity.this), the second one to a OnTimeSetListener object (more on this later), third and floor values to current hour and minutes. Use the calendar objects get() method to do that.
The TimePickerDialog widget can display the time picking mechanism in 2 formats - 12-hour (AM and PM) and 24-hour. If you want to display it in 24-hour format, set the fifth parameters value of the TimePickerDialog constructor to true.
Because were using 24-h format in this tutorial, well set the third parameters value to calendar.get(Calendar.HOUR_OF_DAY). If we used 12-h, wed set it to calendar.get(Calendar.HOUR).
The fourth parameter is set to calendar.get(Calendar.MINUTE).
Inside the OnTimeSetListener() object we have an onTimeSet() method that receives 3 parameters - view, hourOfDay and minute. Display those in a toast.
After that, show the dialog.
@Override
protected void onCreate(Bundle savedInstanceState) {
super.onCreate(savedInstanceState);
setRequestedOrientation(ActivityInfo.SCREEN_ORIENTATION_PORTRAIT);
setContentView(R.layout.activity_main);

Button button = (Button)findViewById(R.id.testButton);

button.setOnClickListener(new View.OnClickListener() {

@Override
public void onClick(View v) {
Calendar calendar = Calendar.getInstance();
myDialog = new TimePickerDialog(MainActivity.this, new OnTimeSetListener() {

@Override
public void onTimeSet(TimePicker view, int hourOfDay, int minute) {
Toast toast = Toast.makeText(MainActivity.this, hourOfDay + ":" + minute, Toast.LENGTH_SHORT);
toast.show();
}
}, calendar.get(Calendar.HOUR_OF_DAY), calendar.get(Calendar.MINUTE), true);
myDialog.show();
}
});

}
Full code:
package com.kircode.codeforfood_test;

import java.util.Calendar;

import android.app.Activity;
import android.app.TimePickerDialog;
import android.app.TimePickerDialog.OnTimeSetListener;
import android.content.pm.ActivityInfo;
import android.os.Bundle;
import android.view.Menu;
import android.view.View;
import android.widget.Button;
import android.widget.TimePicker;
import android.widget.Toast;

public class MainActivity extends Activity{

public TimePickerDialog myDialog;

@Override
protected void onCreate(Bundle savedInstanceState) {
super.onCreate(savedInstanceState);
setRequestedOrientation(ActivityInfo.SCREEN_ORIENTATION_PORTRAIT);
setContentView(R.layout.activity_main);

Button button = (Button)findViewById(R.id.testButton);

button.setOnClickListener(new View.OnClickListener() {

@Override
public void onClick(View v) {
Calendar calendar = Calendar.getInstance();
myDialog = new TimePickerDialog(MainActivity.this, new OnTimeSetListener() {

@Override
public void onTimeSet(TimePicker view, int hourOfDay, int minute) {
Toast toast = Toast.makeText(MainActivity.this, hourOfDay + ":" + minute, Toast.LENGTH_SHORT);
toast.show();
}
}, calendar.get(Calendar.HOUR_OF_DAY), calendar.get(Calendar.MINUTE), true);
myDialog.show();
}
});

}

@Override
public boolean onCreateOptionsMenu(Menu menu) {
// Inflate the menu; this adds items to the action bar if it is present.
getMenuInflater().inflate(R.menu.activity_main, menu);
return true;
}

}
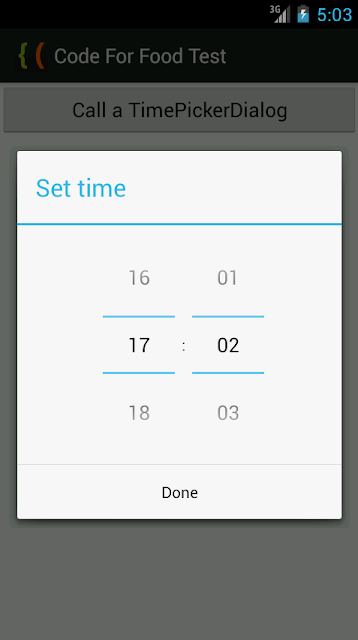
The results look something like this:
Thanks for reading!
Subscribe to:
Posts (Atom)