Showing posts with label how. Show all posts
Showing posts with label how. Show all posts
Sunday, February 15, 2015
What is PHP’s MySQLnd and How It Performs Easy Read Write Splitting
MySQL is the most sought-after database server used with PHP. In fact, PHP web applications are connected to MySQL server by default. Although, some people also use other database servers like Oracle, SQL Server etc. for data storage, but for handling the web workload, MySQL is the most commonly used database.
In the past – PHPs mysql extension, PHPs mysqli and the PDO MYSQL driver – used MySQL Client Library (also known as libmysqlclient) – for communicating with the MySQL database server. But, libmysqlclient interface wasnt optimized for interaction with PHP applications, as the library was primarily built keeping C applications in mind. Thats why, a replacement to the libmysqlclient was developed, called as the MySQL Native Driver (also referred to as mysqlnd); mysqlnd is also a library that provides almost similar functionality as provided by MySQL Client Library.
Also Read: PHP Frameworks and Libraries That Every Web Developer Must Know About
The MySQL Native Driver was made available in PHP 5.3. And it has been the default library that is used to connect to the MySQL Server since the release of PHP 5.4 (although, you can even compile against libmysqlclient). The MySQL Native Driver offers additional features, improved performance, and better memory usage compared to libmysqlclient.
In this post well talk about how you can perform read/write splitting easily with help of PHP’s MySQLnd. But before that it is important to learn about mysqlnd installation process. Also, well discuss about MySQL Native Driver Plugins that youll require in read/write splitting.
Installation
For installing mysqlnd, well have to compile one out of the three MySQL extensions named “ext/pdo_mysql”, “ext/mysqli” and “ext/mysql”. Remember, not to define the path to the MySQL Client Library ( libmysqlclient) in each instance.

Note: Installation of ext/mysql or ext/mysqli, automatically enables the third extension – ext/pdo_mysql.
Furthermore, you can choose an extension, by selecting one or more configure flags as listed below:
--with-mysql
--with-mysqli
--with-pdo-mysql
Lastly, keep in mind that in case youre using Debian, or Ubuntu operating system, you can install the php5-mysqlnd package without a fuss using the following line of code:
$ sudo apt-get install php5-mysqlnd
This will help you get rid of the libmysqlclient php5-mysql package, and instead will let you include all three MySQL extensions.
List of MySQL Native Driver Plugins
MySQL Native Driver not only provide performance benefit, but the biggest benefit it provide is its plugins. You can access the plugins through PECL, and install them using the following line of code:
$ pecl install mysqlnd_<name>
Lets discuss about some of the stable plugins:
- mysqlnd_ms: Helps to carry out read or write splitting between the “master and slave” servers effortlessly, with help of simple load balancing.
- mysqlnd_qc: It embeds a simple query cache to PHP
- mysqlnd_uh: It lets you write mysqlnd plugins in PHP
Performing Read/Write Splitting
In order to split reads and writes, well be using the mysqlnd_ms plugin.
Configuration
After installation of the mysqlnd_ms plugin using PECL, well have to configure php.ini as well as the mysqlnd_ms configuration file.
In php.ini, well add the following lines of code:
extension=mysqlnd_ms.so
mysqlnd_ms.enable=1
mysqlnd_ms.config_file=/path/to/mysqlnd_ms.json
Next, create the mysqlnd_ms.json file, which helps to determine the master and slave servers. In addition, the file also help define the “read or write splitting” and “load balancing strategies”.
Our configuration file consists of one master and one slave:
{
"appname": {
"master": {
"master_0": {
"host": "master.mysql.host",
"port": "3306",
"user": "dbuser",
"password": "dbpassword",
"db": "dbname"
}
},
"slave": {
"slave_0": {
"host": "slave.mysql.host",
"port": "3306"
"user": "dbuser",
"password": "dbpassword",
"db": "dbname"
},
}
}
}
You only need to make changes to one setting called as host, and all others are optional.
Routing Queries
The mysqlnd_ms plugin transparently route the queries – by default – that starts with SELECT to the slave servers. Besides this, the plugin route the queries that doesnt start with SELECT to the master.
This can prove good as well as bad for you. Well, being transparent spares you from making any changes to the code. However, you wont be able to know whether a query is read-only or not, as the plugin doesnt analyze the query.
Apart from not only sending a query that does not start with SELECT to the master, the plugin will send a write query with “SELECT..into the slave” that can prove to be a disaster. Fortunately, the plugin boasts the ability to provide hint regarding sending the query to the right server (i.e. master or slave server). For this, it places one among the below listed three SQL hint constants within the query:
- MYSQLND_MS_MASTER_SWITCH: It helps to run the query statement on the master
- MYSQLND_MS_SLAVE_SWITCH: Allows to run the query statement on the slave
- MYSQLND_MS_LAST_USED_SWITCH: This one enables to run the query statement on the server that was used in the last
In order to use any one of the SQL hints, well need to add a comment prior to the query. One of the easiest way to so requires using sprintf(). Lets consider an example, where the mysqlnd_ms plugin is sending a SELECT to the master, using the first SQL hint constant:
$sql = sprintf("/*%s*/ SELECT * FROM table_name;", MYSQLND_MS_MASTER_SWITCH);
Below mentioned query is used for not sending a SELECT to a slave, using the second SQL hint as discussed above:
$sql = sprintf("/*%s*/ CREATE TEMPORARY TABLE `temp_table_name` SELECT * FROM table_name;", MYSQLND_MS_SLAVE_SWITCH);
Now, lets consider an example where the last hint will help you ensure how the same connection is used just like the one for the query mentioned above. This will ensure that switch from the master to reading has been made, after the data is modified, but still hasnt replicated. In addition, it also ensure that the switch is made when carrying out certain transactions including both read as well as write statements.
if ($request->isPost() && $form->isValid()) {
$user>setValues($form->getValues());
$user->save();
}
$sql = sprintf("/*%s*/ SELECT * FROM user_session WHERE user_id = :user_id", MYSQLND_LAST_USED_SWITCH);
Conclusion
You can split read or write between servers using the mysqlnd_ms plugin. Its a useful plugin, especially when you want to move large legacy PHP applications to using distributed read/write. Though the plugin might not appear to be perfect to many users, but it will definitely get you 80-90% of success – and youll be able to move most applications – without fiddling with the code.
Author Bio
Maria Mincey is a web developer by profession and a writer by hobby and works for Xicom Technologies, a PHP development company. She loves sharing information regarding PHP development tips & tricks. If you are looking forward to hire PHP developers then just get in touch with her.
Saturday, February 14, 2015
Turbo C for Android How to Download and Install
If you are from India and have started learning C/C++ programming from your school days then you have definitely used Turbo C++ compiler. Still many schools, colleges and institutions in India prefer Turbo C++ for teaching students (don’t know about other countries). I do not recommend you to use Turbo C++ compiler for android because it is very outdated (about 23 years old). There is another option i.e. C4droid, it is an awesome C/C++ IDE that supports gcc compiler.


7. If everything will be done correctly then after entering last command a blue screen will open and it is Turbo C++ for Android. You can control the pointer by moving your finger on your touchscreen.
For understanding this tutorial easily I have added a video below that will help you in downloading and installing turbo c++ for android.
Also Read: Download Turbo C++ for Windows 8 for Free
So, lets come to main topic on which I am writing this article. In windows we use DosBox Emulator for running Turbo C++ for Android, in the same way we need an emulator for android platform which is known as AnDosBox. So without wasting much time lets take a look how we can use Turbo C++ for android platform.
Turbo C++ for Android - Steps to Download and Install
1. First of all download Turbo C++ for Android from link: http://sh.st/r5mBt
2. It is compressed so you need to extract it. This can be done by any compression tool like Easy Unrar. You can download it from play store for free.
3. Now after extracting you will get a folder TC and an apk file AnDosBox.
4. Install AnDosBox and move TC folder in your sd card, remember that TC folder must be in sd card not in any other subfolder.
5. Now open AnDosBox that you have already installed. It will look same as like DoxBox that is used in windows.
6. Enter below lines or commands and press enter after each line. You can get the keyboard by pressing the option button situated at left side of your device.
cd tc
cd bin
tc

7. If everything will be done correctly then after entering last command a blue screen will open and it is Turbo C++ for Android. You can control the pointer by moving your finger on your touchscreen.
For understanding this tutorial easily I have added a video below that will help you in downloading and installing turbo c++ for android.
Now just go and install it, write and run your program and share your experience with me. Feel free to ask if you are getting any problem.
Note: If you are unable to change to directory TC then move the TC folder in internal storage and try the process again.
Search Terms:
turbo c compiler for android
c compiler for android
download turbo c++ for android
c compiler for android mobile
Note: If you are unable to change to directory TC then move the TC folder in internal storage and try the process again.
Search Terms:
turbo c compiler for android
c compiler for android
download turbo c++ for android
c compiler for android mobile
Wednesday, February 11, 2015
How to Clean Laptop Parts with Simple Household Products

The popularity earned by potable computers or laptops may decline some day as most of their users use them unaware of the consequences of using them wherever they go. Most of them use these sophisticated devices even while enjoying a cup of coffee or other eatables and the residues of the things you eat near them or the dirt and fingerprints may effect the functioning of the keys as well as the brilliancy of its LCD screen. So these laptops Parts need to be clean frequently for their proper functioning and good appearance.
Also Read: 4 Best Tips to Clean Your Touch Screen Device
Also Read: Top 5 Cheapest Android Tablets below Rs. 5000 in India in 2013
Several companies had introduced various solutions to clean keyboards and LCD screens of the laptops. Though most of them are effective in cleaning these delicate parts of your laptop but most of them are costly solutions. You can also use some of your household products to clean the main usable parts of your laptop as they can be much cheaper than company products if used carefully. Instead of using various complex chemical based cleaning solutions you can use vinegar successfully for this purpose. Before starting the cleaning of your electronic device you should first of turn it off as using liquids on active device is not safe and advisable.
Cleaning of LCD screens
LCD screens are one of the most sophisticated laptops Parts that has to be cleaned very carefully as you should put pressure on them while cleaning. In fact the screen of your laptop should be cleaned gently with a light touch using lint-free cloth in a circular motion, especially on its smudged portions. It should be slightly dampened in a mixture of vinegar and water in equal quantities. Though there can be other household products that can be used instead of vinegar like isopropyl alcohol but you should avoid spraying them directly on the LCD screens as they may damage it. After washing your screen you should dry it, without wiping it hard as it may get damaged, before you shut down your laptop.Cleaning of keyboards
Keyboards are also one of the essential laptop parts that need cleaning frequently as it is more prone to get dirty very easily due to atmospheric dust and dirt as well as your fingerprints. You can clean them all by using lint-free cloth slightly dampened with vinegar or other mild household cleaning solution like isopropyl alcohol or dish washing detergent. Though the keys of your laptop are not as delicate as its screen but still you have to clean them using the same process as you have used on your screen. A gentle circular motion can clean them very efficiently.

Also Read: The 12 Best Tools To Protect Your Password
Also Read: Top 8 Free Alternatives to Paid Softwares
You should avoid spraying any clean solution directly on the keyboards as it may go under the keys and damage the whole system. But to clear out the food remains fastened in between the keys you should not turn it upside down and shake. You can use compressed air products or your handy vacuum cleaner, especially made to clean computers and small household properties, for this purpose.
About Author:
About Author:
We can clean the sophisticated laptops Parts at home with household products without spending a good fortune on them.
Thursday, February 5, 2015
What is Online Marketing Online Marketing Training Course Learn how to Market Online
Online Marketing Fundamentals by 
START LEARNING TODAY!
 or
or 
WATCH THESE 4 FREE VIDEOS FROM THE COURSE
WHO IS THIS COURSE FOR? - What is Online Marketing? - Online Marketing Training Course - Learn how to Market Online
ONLINE MARKETING DEFINED - What is Online Marketing? - Online Marketing Training Course - Learn how to Market Online
COMPONENTS OF ONLINE MARKETING - What is Online Marketing? - Online Marketing Training Course - Learn how to Market Online
DEFINING YOUR TARGET MARKET - What is Online Marketing? - Online Marketing Training Course - Learn how to Market Online
START LEARNING TODAY!
or Course Information
Training Provider: Lynda.com
Title: Online Marketing Fundamentals
Author: Lorrie Thomas Ross
Duration: 1hr 47mins
Date of release: 07 December 2011
Chapter 1: What Is Online Marketing?
Online marketing defined
How online marketing works
Distinctions of online marketing
Components of online marketing
Chapter 2: Building a Foundation
Online marketing planning and success
Defining your target market
Online marketing measurement
Chapter 3: Planning a Web Site for Online Marketing
Site map
Site components
Wireframing
Elements of a successful site
Home page best practices
Privacy policy
Chapter 4: Building or Optimizing a Web Site for Online Marketing
DIY or hire help?
Web site platforms
Domain names
Choosing a hosting company
Web site maintenance and management
Mobile sites
Chapter 5: Content Marketing
Authority marketing
Article marketing
Social media content
Online PR
Web site and email content
Chapter 6: Search Engine Marketing
Overview of search engine marketing (SEM)
Search engine optimization (SEO)
Paid search
Local search
Chapter 7: Social Media Marketing
Social media, social networking, and social media marketing defined
Blogging and microblogging
Social networking
Video sharing
Social shopping and opinions
Social news and social bookmarking
Social events
Wikis
Social media strategy
Chapter 8: Blogging
To blog or not to blog?
Blogging success
Blog content creation ideas
Chapter 9: Online Advertising
Search ads
Display ads
Affiliate marketing
Social media advertising
Local advertising
Email advertising
Chapter 10: Email Marketing
Collecting email addresses
Using a third-party management company
Email messages
About Lynda.com
Lynda.com is an online video training provider with over 1000 courses covering a wide array of topics - 3D, video, business, the web, graphic design, programming, animation, photography, and more. They produce top quality video tutorials with the best industry experts as your instructors. With a subscription, you can log-in at any time, and learn at your own pace. New courses are added each week, and you will receive a certificate of completion for each course that you finish.
Start learning today!
If you enjoyed the sample videos above and want to access the entire Online Marketing Fundamentals course, you can sign up for a lynda.com membership. Your membership will allow you to access not only this course, but also the entire lynda.com library for as low as $25 for 1-month. Their training library has over 1000 courses with 50,000+ video tutorials. No long-term commitment required. You can cancel your membership at any time.
Not yet convinced? Try a FREE 7-day trial.
As a special promotion, visitors of this site can get a FREE 7-day trial to lynda.com. This free trial gives you access to their entire training library of over 1000 courses.
If youre ready to learn how to market online, then become a lynda.com member today, to start viewing this excellent online marketing training course! Your membership also gives you access to the entire lynda.com library of over 1000 courses.Lynda.com is an online video training provider with over 1000 courses covering a wide array of topics - 3D, video, business, the web, graphic design, programming, animation, photography, and more. They produce top quality video tutorials with the best industry experts as your instructors. With a subscription, you can log-in at any time, and learn at your own pace. New courses are added each week, and you will receive a certificate of completion for each course that you finish.
Start learning today!
If you enjoyed the sample videos above and want to access the entire Online Marketing Fundamentals course, you can sign up for a lynda.com membership. Your membership will allow you to access not only this course, but also the entire lynda.com library for as low as $25 for 1-month. Their training library has over 1000 courses with 50,000+ video tutorials. No long-term commitment required. You can cancel your membership at any time.
Not yet convinced? Try a FREE 7-day trial.
As a special promotion, visitors of this site can get a FREE 7-day trial to lynda.com. This free trial gives you access to their entire training library of over 1000 courses.
START LEARNING TODAY!
or How to play presentations on Facebook and Twitter timeline
Thanks to online presentation sharing websites, lot many people now use presentations to share the information with the world. Its a well known fact that in comparison to video, presentation creation is much easy task and now with availability of platforms like Slideshare and authorSTREAM which help you reach masses, presentations are also being used as marketing or branding weapon.
Though creating marketing material in presentation is technically easy as compared to a video ad, yet most viral distribution channels aka social media platforms only support videos and photo uploads. However, off late most of the popular social media platforms like G+, Pinterest, Facebook, LinkedIn and Twitter have enabled presentation embeds of SlideShare and authorSTREAM on the timeline or newsfeed. So if you want to play your presentations on these social media platforms, just upload your presentations on authorSTREAM or SlideShare as public upload and share the link on Twitter or Facebook.

Though creating marketing material in presentation is technically easy as compared to a video ad, yet most viral distribution channels aka social media platforms only support videos and photo uploads. However, off late most of the popular social media platforms like G+, Pinterest, Facebook, LinkedIn and Twitter have enabled presentation embeds of SlideShare and authorSTREAM on the timeline or newsfeed. So if you want to play your presentations on these social media platforms, just upload your presentations on authorSTREAM or SlideShare as public upload and share the link on Twitter or Facebook.
While SlideShare presentations play on Pinterest, LinkedIn and Twitter, they fail to play on Facebook. Presentations uploaded on authorSTREAM play on Facebook as well as Twitter timeline. Upload your content on these platforms, share the web link and get more accolades (views, comments, shares, re-tweets) since your audience need not to leave the platform to see your worthy masterpiece.
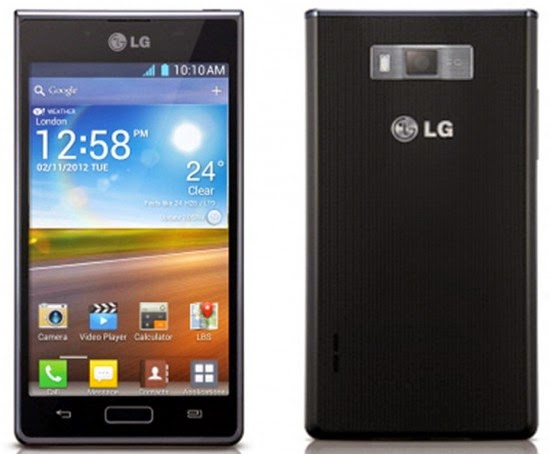
How to remove pattern lock and hard reset your LG P700 P705 L7
Hi there,
If you forgot your password and you are unable to unlock your phone, well you came to the right place. If you already followed all tutorial in the internet then maybe this is your last resort. I will show you how to remove password, pattern lock and this can even fix Hang in logo issue on your LG P700 / P705 or also known L7.
This procedure will work in Linux / Windows, sorry Mac users I dont know the command in OSX. Anyways I will explain first the Linux ways.
You can use this in any Debian distro such as Ubuntu, Kubuntu, Lubuntu, Crunchbang etc etc.. Okay here it is.
In your Linux system, install first the android-tools-adb
To install it go to your Terminal and then just type in;
sudo apt-get install android-tools-adb
Okay next we are going to wipe your phone now. Just follow the instructions I will just keep it simple :)
1. Press and Hold Volume UP and Volume DOWN, then insert USB Cable without releasing the buttons. And then Also press the Home Button. Just hold the three buttons until you see the recovery mode in your LG L7. Something like in the picture. Im sorry for the picture because I dont have the phone in my hand when I am writing this article. But for your reference something like that.

2. Launch Terminal and execute this command
sudo adb reboot recovery
press enter and then enter your password
3. Your device will reboot and then it will wipe the whole device.
Windows Way
First you need to have the following files:
1. Driver –----- >> L7 Driver
2. Adb tools –-->> adb tools
After downloading the files extract and install the l7 driver, after installing the driver go to adb-fastboot-win folder

And look for adb recovery.bat and run it.
And it will look something like this

Thats it you have successfully wipe your phone. And ready to setup and use it again.
I hope this tutorial help you. If you find any wrong procedure please drop us a comment.
Tuesday, February 3, 2015
Monday, February 2, 2015
PhoneGap How to create database store values and retrive values from database CRUD in phonegap example
Hi Friends,
I am going to explain how to create database , insert values into tables,retrive value them using android and phonegap.
Environment :
1) Require to install android sdk.
2) Add PhoneGap plugin for Eclipse.
Example : Database CRUD Example using Android and Phonegap.
Step 1:
create a new phonegap project name it as DataBase,package name as com.sree.database.
Step 2:
now create a new file and name it as database.js as we need to write our java script functions in this file.
Step 3 :
now write the following functions in the java script file.
populateDB(tx){I am going to explain how to create database , insert values into tables,retrive value them using android and phonegap.
Environment :
1) Require to install android sdk.
2) Add PhoneGap plugin for Eclipse.
Example : Database CRUD Example using Android and Phonegap.
Step 1:
create a new phonegap project name it as DataBase,package name as com.sree.database.
Step 2:
now create a new file and name it as database.js as we need to write our java script functions in this file.
Step 3 :
now write the following functions in the java script file.
function
tx.executeSql(
DROP TABLE IF EXISTS DEMO);tx.executeSql(
CREATE TABLE IF NOT EXISTS DEMO(id unique,data));tx.executeSql(
INSERT INTO DEMO(id,data) VALUES (1,"First Row"));tx.executeSql(
INSERT INTO DEMO(id,data) VALUES (2,"SECOND ROW"));}Explanation :
executeSql function is used to execute sql statements using tx object.
the above function drops table demo if it is allready exists then crteates table demo if not allready exists and stores id and data values.and inserts some data into demo table.
function
errorCB(err){console.log(
"Error processing SQL:" + err.code);document.getElementById(
sql-result).innerHTML = "<STRONG>Error processing SQL: " + err.code + "</STRONG>";}if there is any error like not creating database or any syntax errors will be displayed in the console with sql error.
function
successCreateCB(){console.log(
"Database has been created successfully");document.getElementById(
sql-result).innerHTML = "<STRONG>DATABASE HAS BEEN CREATED SUCCESSFULLY</STRONG>"; }if it is created successfully then it shows database has been created successfully.
var
db=0;function
createDB(){if(!db){db=window.openDatabase(
"Database","1.0","PhoneGap Training",200000);}
db.transaction(populateDB,errorCB,successCreateCB);
}if you want to create database use the above function.
function
querySuccess(tx,results){console.log(
"Rows Effected = "+ results.rowEffected);console.log(
"No of Rows = " + results.rows.length);document.getElementById(
sql-result).innerHTML = ("<STRONG>number of rows" + results.rows.length + "</STRONG>");}the above function give number of rows inserted.
function
queryDB(tx){tx.executeSql(
SELECT * FROM DEMO,[],querySuccess,errorCB);}
The above function is used to retrive all rows and columns from the table.
function
getSqlResultSet(){if(!db){db=window.openDatabase(
"Database","1.0","PhoneGap Training",200000);}
db.transaction(queryDB,errorCB);
}to retrive the sql result set use the above function.
function
writeLocalStorage(){window.localStorage.setItem(
"myKey", "vmSoftTech");var keyname = window.localStorage.key(0);document.getElementById(
local-storage-result).innerHTML = "Wrote key: <strong>" + keyname + "</strong>";}As phonegap supports localstorage we can write values to local storage using the above method.
function
readLocalStorage(){var value = window.localStorage.getItem("myKey");if(!value){document.getElementById(
local-storage-result).innerHTML = "<strong>Null</strong> - Try Write first"; }
else{document.getElementById(
local-storage-result).innerHTML = "Got value: <strong>" + value + "</strong>";}
}As phonegap supports localstorage we can read values from localstorage using the above method.
function
removeItemLocalStorage(){window.localStorage.removeItem(
"myKey");document.getElementById(
local-storage-result).innerHTML = "Removed key/value: <strong>myKey/vmSoftTech</strong>";}we can also remove localstorage item using the above function.
Step 4 :
now we edit the index.html file and call all the methods above.
<!-- Copyright (c) 2012 Mobile Developer Solutions -->
<!
DOCTYPE HTML><
html><head><meta http-equiv="Content-type" name="viewport" content="initial-scale=1.0, maximum-scale=1.0, user-scalable=no, width=device-width"><title></title><script type="text/javascript" charset="utf-8" src="phonegap-1.4.1.js"></script><link rel="stylesheet" href="index.css" /> </head><body><h2>Storage</h2><blockquote><p>Provides access to the devices storage options.</p></blockquote><h4 class="help">Based on <b>W3C Web SQL Database Spec</b> and <b>W3C Web Storage API Spec</b></h4> <a class="btn" onclick="createDB();">Create DB</a><a class="btn" onclick="getSqlResultSet();">SQL Result Set</a><div class="result-block">SQL Result:
<br/><span id="sql-result"></span><br/></div><br/> <a class="btn" onclick="writeLocalStorage();">Write LocalStorage</a><a class="btn" onclick="readLocalStorage();">Read LocalStorage</a><a class="btn" onclick="removeItemLocalStorage();">Remove Item</a><div class="result-block">Local Storage:
<span id="local-storage-result"></span><br/></div><!-- /scrollable --><div id="footer" ><h1>© 2012 Mobile Developer Solutions</h1></div><script type="text/javascript" charset="utf-8" src="database.js"></script> </body></
html>step 5 :
now we need to design our screen to look good so create index.css file and insert the following code .
body
{background-color: #F6F4F2;font-family: "Helvetica Neue", Helvetica, Arial, sans-serif;font-size: .9em;line-height: 1.1em;margin: 0px;}
h1,ul,li
{margin: 0px;padding: 0px;}
#header
{background-color: #515151;background: #515151-webkit-gradient(linear, left top, left bottom, color-stop(0.2, #515151),color-stop(0.8, #302F2D) );border-top: 1px solid #919192;height: 32px;left: 0px;position: fixed;top: 0px;width: 100%;z-index: 1;}
#subheader
{ display: none; }#footer
{display: none;background-color: #515151;background: #515151-webkit-gradient(linear, left bottom, left top, color-stop(0.2, #515151),color-stop(0.8, #302F2D) );border-top: 1px solid #919192;height: 32px;position: fixed;bottom: 0px;width: 100%;z-index: 1;}
#sidebar
{background-color: #ECEAE7;overflow: auto;padding: 30px 2% 20px 0px;text-align: right;/* position: fixed; */float: left;width: 22%; top: 33px;bottom: 0px;z-index: 1;border-right: 1px solid #999;}
#sidebar
ul,#sidebar li {margin: 0px;padding: 0px;}
#sidebar
li, #sidebar li a {color: #767573;font-size: 1.06em;list-style: none;margin: 1.05em 0px;}
#scrollable
{/* position: fixed; */padding: 20px 2% 0px 1%;float: right;width: 72%;overflow: auto;top: 33px;}
#content
{ margin: 20px 2% 0px; color: #313131;/* position:absolute;*//* overflow:auto;*/z-index: 0;}
#header
h1, #footer h1 {color: #F6F4F2;font-size: 1.2em;font-weight: normal;line-height: 32px;margin: 0px;text-align: center;text-shadow: 0px -1px 1px #222222;}
#footer
h1 {font-size: .9em;text-align: left;padding-left: 16px;}
#content
h2 {border-bottom: 1px solid #ccc;padding-bottom: 0.25em;color: #e87a12;font-size: 1.4em;font-weight: bold;margin: 1.3em 0px 0.8em 0px;text-shadow: #FFFFFF 0px 1px 1px;}
code
{ font-weight: bold; font-size: 1.0em;color: #bc6108;}
blockquote
{color: #767573;font-style: normal;margin-left: 30px;margin-right: 10px;padding-left: 6px;position: relative;text-shadow: #FFFFFF 0px 1px 0px;}
blockquote
p {padding: 5px 0px;font-size: 0.8em;}
blockquote
::before {font-style: normal;content: 201C;font-size: 400%;font-family: Georgia, Palatino, Times New Roman, Times;;position: absolute;left: -25px;top: 0.2em;color: #E0E0E0;}
ul
{margin-left: 40px;}
ul
>li {list-style: disc;list-style-position: outside;}
ul
ul {margin-bottom: 0.5em;margin-top: 0.5em;}
a
.btn {border: 1px solid #555;-webkit-border-radius: 5px;border-radius: 5px;text-align:center;display:block;/* float:left; */
clear: both;background:#eceae7;width:90%;color:#e87a12;font-size:1.1em;font-weight: bold;text-decoration:none;padding:0.7em 0.1em;margin: 5px auto; }
a
.btn.deux {clear: none;float:left;width: 45%; margin:6px 3px 3px;}
a
.btn.trois {clear: none;float:left;width: 30%;margin:6px 2px 3px;}
#deviceinfo
{border-collapse:collapse;width:75%;margin: 20px auto;}
#deviceinfo
tr th.alt, #deviceinfo tr td.alt {text-align:left;}
#deviceinfo
, th, td {border: 1px solid #ccc;}
#deviceinfo
th {font-size:1.15em;padding-top:4px;padding-bottom:4px;background-color:#e89442;color:#f0f0f0;height: 1.3em;}
#deviceinfo
td, #deviceinfo th {padding:3px 7px 2px 7px;vertical-align:bottom;text-align:right;}
.result-block
{clear: both;margin-top: 0.3em;}
#accel-data
{margin-bottom: 15px;width: 95%;}
dl
{clear:both;list-style-type:none;padding-left:2px;overflow:auto;}
dl
> dt{float:left;margin-top: 15px;margin-left:5px;}
dl
> dd{float:left;font-weight:bold;margin-top: 15px;margin-left: 10px;margin-right: 25px;}
.api-div
{display: none;margin-bottom: 0.6em;}
.api-div
h4 {display: block; font-size: 0.8em;font-weight: normal; background: #eceae7; border-left: 6px solid #de2c2c;padding: 5px 8px;}
.api-div
.help {border-left: 6px solid #188f8f;}
#cameraImage
{border: 2px solid #666;display: none;margin: 1.7em auto;width:200px;height:150px;}
#eventOutput
{height:1.5em;display: block;}
#map
{width: 180px; height: 140px; border: 2px solid #666;display: none;margin: 1.0em auto; }
@media
screen and (max-width: 320px) and (orientation:portrait) {/* #header h1 { color: #f00; } For TESTING */ #sidebar { display: none; } #scrollable {padding: 0px;margin: 64px 1% 0px 1%;float: left;width: 97%;overflow: auto;}
#subheader {display: block;background-color: #CBCBCB;background: -webkit-gradient(linear, left top, left bottom, color-stop(0.0, #F9F9F9),color-stop(1.0, #CBCBCB) );border-top: 1px solid #383A3C;border-bottom: 1px solid #919395;height: 42px;left: 0px;position: fixed;top: 33px;width: 100%;z-index: 1;text-align:center;}
select {font-size: 1.65em;font-weight: bold;padding: 5px 16px 5px 20px;color: #444;background-color: #e8a35f;margin: 3px auto;}
#deviceinfo {width:90%;}
}
@media
all and (min-width: 800px){/* #header h1 { color: #0f0; } FOR TESTING */#content {font-size: 1.0em;line-height: 1.2em;}
#content h2 {padding-bottom: 0.4em;font-size: 2em;margin-top: 2em;}
blockquote {margin-top: 20px;margin-bottom: 30px;}
blockquote p {/* padding: 5px 0px; 10px 0px; */font-size: 0.95em;}
blockquote code {font-size: 1.2em;}
#cameraImage {width: 400px;height: 300px;}
#map {width: 360px; height: 280px; margin: 1.5em auto;}
#content {margin: 30px 3% 0px;}
#sidebar {padding-top: 15px;position: fixed;}
#sidebar li,#sidebar li a {font-size: 1.2em;margin: 1.8em 0px;}
.api-div h4 {font-size: 0.9em;}
#footer {display: block;}
}
@media
all and (min-width: 1200px){/*#header h1 { color: #ff0; } FOR TESTING */blockquote p {/* padding: 5px 0px; 10px 0px; */font-size: 1.0em;}
blockquote code {font-size: 1.3em;}
#deviceinfo {width:50%;}
#deviceinfo th {font-size:1.35em;height: 1.4em;}
#deviceinfo td, #deviceinfo th {font-size: 1.1em;}
#footer {display: none;}
}
Step 6:
finally your javascript file looks like this,
function
populateDB(tx){tx.executeSql(
DROP TABLE IF EXISTS DEMO);tx.executeSql(
CREATE TABLE IF NOT EXISTS DEMO(id unique,data));tx.executeSql(
INSERT INTO DEMO(id,data) VALUES (1,"First Row"));tx.executeSql(
INSERT INTO DEMO(id,data) VALUES (2,"SECOND ROW"));}
function
errorCB(err){console.log(
"Error processing SQL:" + err.code);document.getElementById(
sql-result).innerHTML = "<STRONG>Error processing SQL: " + err.code + "</STRONG>";}
function
successCreateCB(){console.log(
"Database has been created successfully");document.getElementById(
sql-result).innerHTML = "<STRONG>DATABASE HAS BEEN CREATED SUCCESSFULLY</STRONG>"; }
var
db=0;function
createDB(){if(!db){db=window.openDatabase(
"Database","1.0","PhoneGap Training",200000);}
db.transaction(populateDB,errorCB,successCreateCB);
}
function
querySuccess(tx,results){console.log(
"Rows Effected = "+ results.rowEffected);console.log(
"No of Rows = " + results.rows.length);document.getElementById(
sql-result).innerHTML = ("<STRONG>number of rows" + results.rows.length + "</STRONG>");}
function
queryDB(tx){tx.executeSql(
SELECT * FROM DEMO,[],querySuccess,errorCB);}
function
getSqlResultSet(){if(!db){db=window.openDatabase(
"Database","1.0","PhoneGap Training",200000);}
db.transaction(queryDB,errorCB);
}
function
writeLocalStorage(){window.localStorage.setItem(
"myKey", "vmSoftTech");var keyname = window.localStorage.key(0);document.getElementById(
local-storage-result).innerHTML = "Wrote key: <strong>" + keyname + "</strong>";}
function
readLocalStorage(){var value = window.localStorage.getItem("myKey");if(!value){document.getElementById(
local-storage-result).innerHTML = "<strong>Null</strong> - Try Write first"; }
else{document.getElementById(
local-storage-result).innerHTML = "Got value: <strong>" + value + "</strong>";}
}
function
removeItemLocalStorage(){window.localStorage.removeItem(
"myKey");document.getElementById(
local-storage-result).innerHTML = "Removed key/value: <strong>myKey/vmSoftTech</strong>";}
Subscribe to:
Comments (Atom)