Friday, February 27, 2015
Great Shopping Deals Year Round Not Just Black Friday!
Obviously everyone knows about Amazon, but do you know that you can easily find the price history of any item on Amazon to tell if youre getting a good deal or not?!
.jpg)
First things first, head to Amazon, and pull up an item that you are interested in. I pulled up Avery 5160 Labels... my favorite! :)

Copy the link from your address bar (e.g.: http://www.amazon.com/Avery-Address-Labels-Printers-08160/dp/B00004Z5SM/ref=sr_1_2?ie=UTF8&qid=1353641122&sr=8-2&keywords=avery+5160+labels ). You can copy the link by choosing Edit > Copy, or by doing Control + C on a PC, or Command + C on a Mac.

In the top right hand corner, there is a box that says "Enter Amazon URL or keywords to find products." Click in that box and paste in the web address that you just copied. You can paste the link by choosing Edit > Paste, or by doing Control + V on a PC, or Command + V on a Mac.

Click "Find Products" next to where you pasted the link. If you scroll down a little bit, youll see a chart that shows the items price history.

If you keep scrolling, youll find a list of the dates when the item was highest priced and lowest priced, as well as the last 5 price changes.

So... if youre looking to find out if youre getting a good deal on the item you can easily tell! Right now these labels are pretty reasonably priced... perhaps I need to stock up.
But, wait... I havent even told you the best part yet! If you create a free account for the website, you can get email alerts when the item drops below a certain price!
Head back to the main website, http://camelcamelcamel.com/ . Click "Sign Up" (in the top right hand corner, or towards the middle right of the screen.)

Paste back in your item link. In that big maroon box, it says "Create Amazon price watches for: ...your item..." Right below that, there is a green box that says "Amazon." In the desired price box, enter your desired price.

When your item drops below that price, CamelCamelCamel will send you an email alerting you of the new price. (For those of you worried about junk mail... Ive used this option for a few months and I havent noticed any additional spam from it!)
If you want to check which items you are tracking, you can always click "Your Price Watches" at the top of the page.

printer ink! I am absolutely loving it!
Id love to hear about what items youre loving from Amazon that youre going to enter into the price tracker... and Id love to hear about any Black Friday excursions you went on!!!!
Wednesday, February 18, 2015
High Quality Social Media Icons
Free Download High Quality Social Media Icons for iPhone & technology blogs. These social media icons are of high quality and appealing to become the very asset of your blog. Enjoy!
Type : PNG
Category : Icons
License : Free
Author : Designbolts
Download
Sunday, February 15, 2015
Java program to find whether a number is armstrong or not

class Armstrong
{
public static void main(String...s)
{
int m,n,i,j=0;
n=Integer.parseInt(s[0]);
m=n;
while(n!=0)
{
i=n%10;
j+=(i*i*i);
n/=10;
}
if(j==m)
System.out.println("
Number is armstrong");
else
System.out.println("
Number is not armstrong");
}
}
27 Free Perspective App Screen PSD Mockups

If you’re designing an app, you’ll need some screen mock-up templates, to showcase your design. if youre ui designer and develop an mobile app, you should design something app screen showcase and shown to the client included angle perspectives.
So, in this post, Collection of 27 Free PSD Perspective App Screen Mockups. use the smart objects to place your design, you can easily change the background color and the depth size of the screens.
1- App Screen Mock-Up Perspective PSD

2- Perspective App Screen Mock-Up PSD

3- Isometric Perspective MockUp PSD

4- Perspective App Screens Mock-Up PSD

5- Iphone 6 Wrap Around Screen Mockup PSD

6- Free PSD App Screen iOS 7

7- iOS 7 Weather App Design PSD

8- Free 3D Perspective Mockup PSD

9- Perspective App Screen PSD Mock-Up

10- Perspective Tablet Mock-Up PSD

11- Perspective App Screens Mock-Up PSD

12- 3D Mobile App Screens Mock-Up PSD

13- Free PSD Mockup Isometric Mobile App Screen

14- Free PSD Perspective App Screens Mock-Up

15- App Screen Showcase Mockup PSD

16- App Screen Presentation Mock-ups PSD

17- App Screens Perspective MockUp PSD

18- Free PSD Perspective Mockup Template

19- Perspective Mobile Screen Mock-up PSD

20- Android / iPhone Perspective App Mockup PSD

21- iPhone App Front Screen MockUp PSD

22- PSD Perspective Mobile Mock-up Screen

23- Perspective Screen MockUp PSD

24- Free PSD Perspective Screen MockUp

25- Free PSD Mobile Screen MockUp

26- Perspective App Screens PSD Mockup

27- App Screen MockUp PSD

Professional One Page Resume PSD Temlate

Free Download Professional One Page Resume Template in PSD File, perfect to advertise your skills, your personality, and your experience to get a dream job opportunities and clients.
Type : PSD
Category : Print Templates
License : Free
Author : Ibrandstudio
Download

Reading AMSR 2 Data into GeoTIFF raster using gdal grid
The following is not an exhaustive description, but extended notes on how to read AMSR-2 files, which possibly may be of help to others trying to solve a similar task.
For some, the final commented script at our github page may be enough help, the text below tries to explain the most important steps in this script:
The various frequency bands of AMSR-2 have different resolution (see the product specs and the user manual ), we choose the L1R dataset, where the data is already processed to match the geolocation stored in the lat/long band for 89GHz.
Information on the hdf image can be retrieved with gdalinfo:
gdalinfo C:UsersmaxDocumentsGW1AM2_201301311114_050A_L1SGBTBR_1110110.h5
The metadata printed out contains the names of the subchannels, as seen here:
and information about a specific channel can be retrieved by using gdalinfo on exactly this subchannel-name from the metadata:
gdalinfo HDF5:"C:UsersmaxDocumentsGW1AM2_201301311114_050A_L1SGBTBR_1110110.h5"://Brightness_Temperature_(89.0GHz-A,V)
Opening one of the bands in QGIS, the data looks like this (all images in this post are © JAXA EORC ):
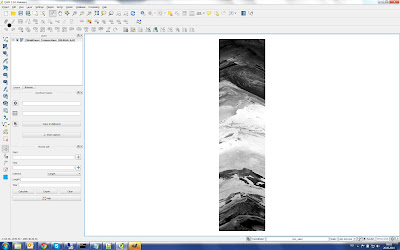
In this example we want to convert the data into the NSIDC sea ice raster (EPSG:3411) covering the Arctic areas, using the gdal_grid utility, which creates a regular grid out of a point collection.
Important to know: The 89GHz channel is divided into 89A and 89B, and only both together give the full resolution of about 5km. Each 89 GHz channel has an associated latitude and a longitude raster giving the coordinates for each pixel. For the L1R product, the geolocation information of other frequencies with lower resolution can be derived from the 89A longitude and latitude raster by using only their odd columns.
In the first step, I unzip the gz - zipfiles, then open the hdf file (*.h5). The various frequency bands are stored in Subdatasets, so you open the hdf file with gdal.open(), but then use again gdal.open() for a subdataset (for information on the bands you can run gdalinfo on the *.h5 files:
HDFfile = gdal.Open( rC:UsersmaxDocumentsGW1AM2_201301311114_050A_L1SGBTBR_1110110.h5 )

HDF_bands = HDFfile.GetSubDatasets()

#HDF Subdatasets are opened just as files are opened:
HDF_SubDataset = gdal.Open(HDF_bands[channel][0])
HDF_SubDataset_array = HDF_SubDataset.ReadAsArray()

HDF_Lat89A = gdal.Open(HDF_bands[46][0])
HDF_Lat89A_array = HDF_Lat89A.ReadAsArray()

HDF_Lon89A = gdal.Open(HDF_bands[48][0])
HDF_Lon89A_array = HDF_Lon89A.ReadAsArray()
In the next step, a create a comma-separated file containing longitude, latitude, brightness values for each raster point. This comma separated file is then the input for gdal_grid. I loop through each pixel and write the three values ( longitude, latitude, brightness ) into a csv-file.
So for the 89GHz channel, I write both 89A and 89B to a csv-file:
#Add header line to textfile
textfile = open( AMSRcsv, w)
textfile.write(lon,lat,brightness
)

## Loop through each pixel and write lon/lat/brightness to csv file
for i in range(rows):
    for j in range(cols):
        wgs84=pyproj.Proj("+init=EPSG:4326")
        EPSG3411=pyproj.Proj("+init=EPSG:3411")

        lonA = HDF_Lon89A_array[i,j]
        latA = HDF_Lat89A_array[i,j]

        # lon/lat written to file already projected to EPSG:3411
        (lonA_3411, latA_3411) = pyproj.transform(wgs84, EPSG3411, lonA, latA)
        brightnessA = HDF_Br89AH_array[i,j]* 0.01 #APPLYING SCALING FACTOR!

        lonB = HDF_Lon89B_array[i,j]
        latB = HDF_Lat89B_array[i,j]

        # lon/lat written to file already projected to EPSG:3411
        (lonB_3411, latB_3411) = pyproj.transform(wgs84, EPSG3411, lonB, latB)
        brightnessB = HDF_Br89BH_array[i,j]* 0.01 #APPLYING SCALING FACTOR!

        if 35 < latA < 90:
            textfile.write(str(lonA_3411) + , + str(latA_3411) + , + str(brightnessA) +
)

        if 35 < latB < 90:
            textfile.write(str(lonB_3411) + , + str(latB_3411) + , + str(brightnessB) +
)

textfile.close()
For the lower resolution channels, I use the odd numbers of the 89A long and lat channel:
#Add header line to textfile
textfile = open( AMSRcsv, w)
textfile.write(lon,lat,brightness
)

## Loop through each pixel and write lon/lat/brightness to csv file
for i in range(rows):
    for j in range(cols):
        wgs84=pyproj.Proj("+init=EPSG:4326")
        EPSG3411=pyproj.Proj("+init=EPSG:3411")

        #For low resolution the odd columns of Lon/Lat89 array to be taken!
        lonA = HDF_Lon89A_array[(i) ,(j*2+1)]
        latA = HDF_Lat89A_array[(i) ,(j*2+1)]

        # lon/lat written to file already projected to EPSG:3411
        (lonA_3411, latA_3411) = pyproj.transform(wgs84, EPSG3411, lonA, latA)
        brightnessA = HDF_SubDataset_array[i,j]* 0.01 #APPLYING SCALING FACTOR!

        if 35 < latA < 90:
            textfile.write(str(lonA_3411) + , + str(latA_3411) + , + str(brightnessA) +
)

textfile.close()
Now I can almost run the gdal_grid, but as described at http://www.gdal.org/gdal_grid.html I need to create a xml file describing my comma-separated csv file.
<OGRVRTDataSource>
 <OGRVRTLayer name="GW1AM2_201301010834_032D_L1SGRTBR_1110110_channel89H">
  <SrcDataSource>G:AMSRGW1AM2_201301010834_032D_L1SGRTBR_1110110_channel89H.csv</SrcDataSource>
  <GeometryType>wkbPoint</GeometryType>
  <GeometryField encoding="PointFromColumns" x="lon" y="lat" z="brightness" />
 </OGRVRTLayer>
</OGRVRTDataSource>
This xml file above can be created in a python script in the following manner, some more info here:
root = ET.Element("OGRVRTDataSource")

OGRVRTLayer  = ET.SubElement(root, "OGRVRTLayer")
OGRVRTLayer.set("name", AMSRcsv_shortname)

SrcDataSource = ET.SubElement(OGRVRTLayer, "SrcDataSource")
SrcDataSource.text = AMSRcsv

GeometryType = ET.SubElement(OGRVRTLayer, "GeometryType")
GeometryType.text = "wkbPoint"

GeometryField = ET.SubElement(OGRVRTLayer,"GeometryField")
GeometryField.set("encoding", "PointFromColumns")

GeometryField.set("x", "lon")
GeometryField.set("y", "lat")
GeometryField.set("z", "brightness")

tree = ET.ElementTree(root)
tree.write(AMSRcsv_vrt)
Now we finally can run gdal_grid, either command line: gdal_grid -a_srs EPSG:3411 -a average:radius1=4000:radius2=4000:min_points=1 -txe -3850000 3750000 -tye -5350000 5850000 -outsize 760 1120 -l GW1AM2_201301010834_032D_L1SGRTBR_1110110_channel89H GW1AM2_201301010834_032D_L1SGRTBR_1110110_channel89H.vrt GW1AM2_201301010834_032D_L1SGRTBR_1110110_channel89H.tif
or called from a Python script:
AMSRcsv_shortname =  GW1AM2_201301010834_032D_L1SGRTBR_1110110_channel89H
AMSRcvs_vrt = GW1AM2_201301010834_032D_L1SGRTBR_1110110_channel89H.vrt
AMSR_tif = GW1AM2_201301010834_032D_L1SGRTBR_1110110_channel89H.tif

radius1 = 4000
radius2 = 4000
os.system(gdal_grid -a_srs EPSG:3411 -a average:radius1= + str(radius1) + :radius2= + str(radius2) + :min_points=1 -txe -3850000 3750000 -tye -5350000 5850000 -outsize 760 1120 -l  + AMSRcsv_shortname +    + AMSRcsv_vrt +   + AMSR_tif)
The radius indicates in which distance around a given output raster point the algorithm searches for points falling into the NSIDC raster -- if too small, it will result in empty pixels, if too large there will be too much smoothing since many pixels are averaged into one.
The result is, finally, the part of the swath falling into the NSIDC-raster:
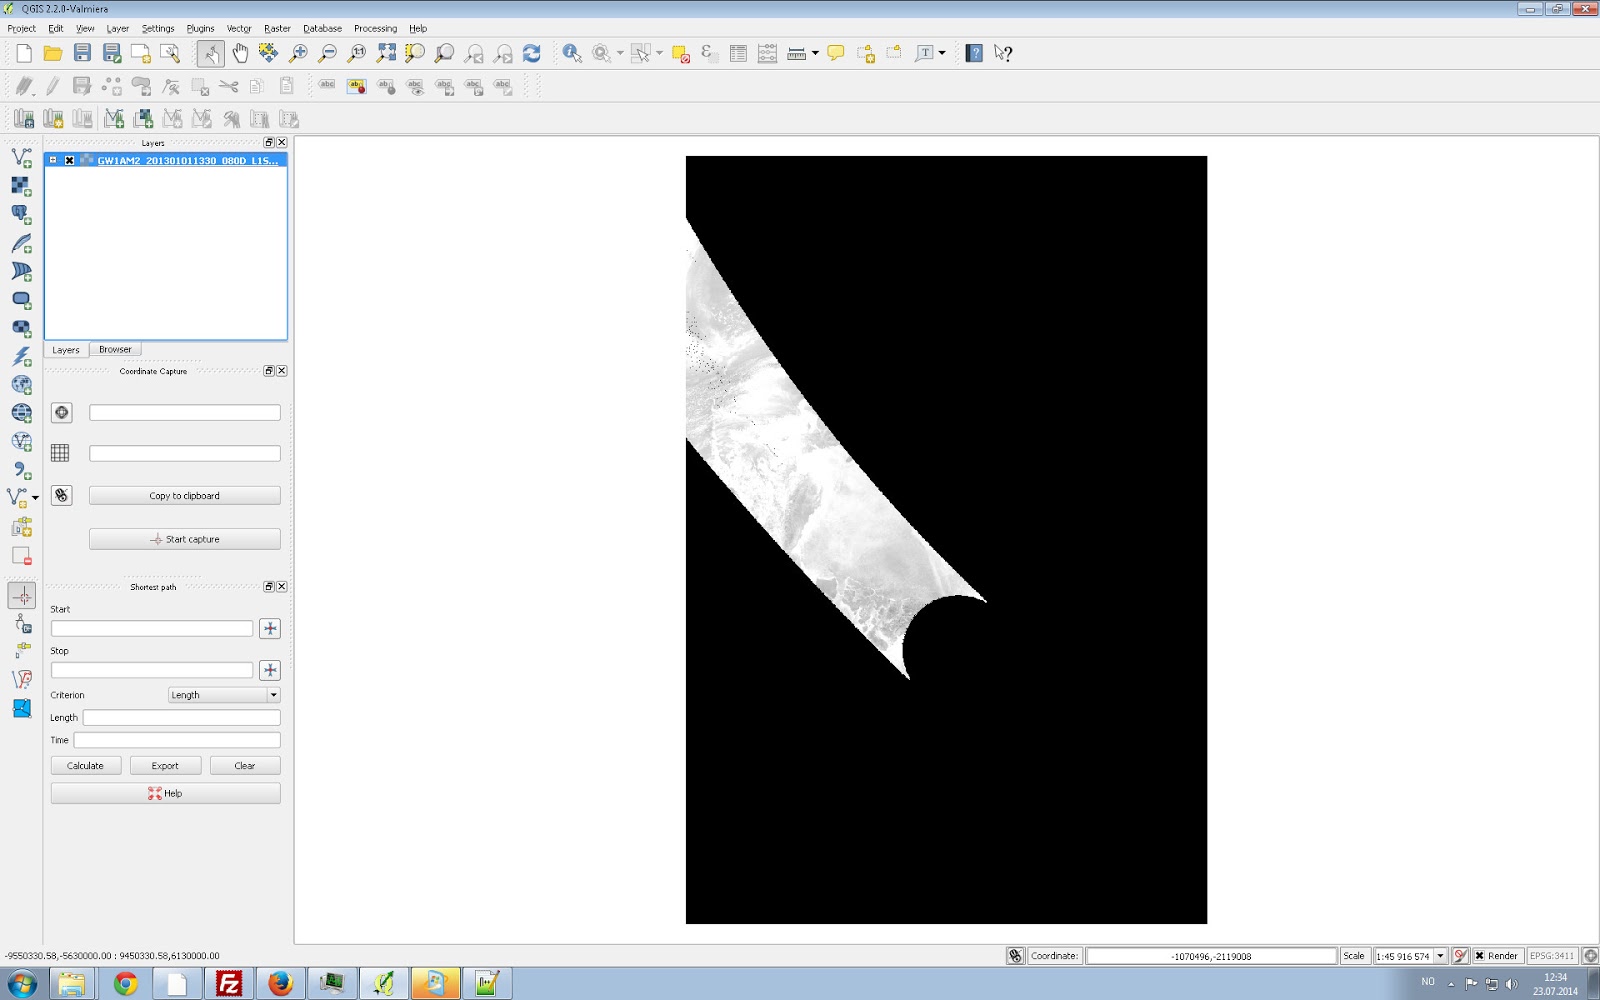
In a final step, I take all of such swaths for one day and average them into a full image of that given day, see the Average Daily function in the script for details (images © JAXA EORC ).
One issue using gdal_grid is its very low performance regarding speed (see this comment ), one 89GHz band takes 10 minutes and a lower resolution band 2 minutes calculation time. This is then about 25 minutes for all channels of one hdf file, and since every day has about 20 files, this means 8 hours for one averaged daily raster. gdal_grid may therefore not always be feasible until the speed issue is improved.
What is PHP’s MySQLnd and How It Performs Easy Read Write Splitting
MySQL is the most sought-after database server used with PHP. In fact, PHP web applications are connected to MySQL server by default. Although, some people also use other database servers like Oracle, SQL Server etc. for data storage, but for handling the web workload, MySQL is the most commonly used database.
In the past – PHPs mysql extension, PHPs mysqli and the PDO MYSQL driver – used MySQL Client Library (also known as libmysqlclient) – for communicating with the MySQL database server. But, libmysqlclient interface wasnt optimized for interaction with PHP applications, as the library was primarily built keeping C applications in mind. Thats why, a replacement to the libmysqlclient was developed, called as the MySQL Native Driver (also referred to as mysqlnd); mysqlnd is also a library that provides almost similar functionality as provided by MySQL Client Library.
Also Read: PHP Frameworks and Libraries That Every Web Developer Must Know About
The MySQL Native Driver was made available in PHP 5.3. And it has been the default library that is used to connect to the MySQL Server since the release of PHP 5.4 (although, you can even compile against libmysqlclient). The MySQL Native Driver offers additional features, improved performance, and better memory usage compared to libmysqlclient.
In this post well talk about how you can perform read/write splitting easily with help of PHP’s MySQLnd. But before that it is important to learn about mysqlnd installation process. Also, well discuss about MySQL Native Driver Plugins that youll require in read/write splitting.
Installation
For installing mysqlnd, well have to compile one out of the three MySQL extensions named “ext/pdo_mysql”, “ext/mysqli” and “ext/mysql”. Remember, not to define the path to the MySQL Client Library ( libmysqlclient) in each instance.

Note: Installation of ext/mysql or ext/mysqli, automatically enables the third extension – ext/pdo_mysql.
Furthermore, you can choose an extension, by selecting one or more configure flags as listed below:
--with-mysql
--with-mysqli
--with-pdo-mysql
Lastly, keep in mind that in case youre using Debian, or Ubuntu operating system, you can install the php5-mysqlnd package without a fuss using the following line of code:
$ sudo apt-get install php5-mysqlnd
This will help you get rid of the libmysqlclient php5-mysql package, and instead will let you include all three MySQL extensions.
List of MySQL Native Driver Plugins
MySQL Native Driver not only provide performance benefit, but the biggest benefit it provide is its plugins. You can access the plugins through PECL, and install them using the following line of code:
$ pecl install mysqlnd_<name>
Lets discuss about some of the stable plugins:
- mysqlnd_ms: Helps to carry out read or write splitting between the “master and slave” servers effortlessly, with help of simple load balancing.
- mysqlnd_qc: It embeds a simple query cache to PHP
- mysqlnd_uh: It lets you write mysqlnd plugins in PHP
Performing Read/Write Splitting
In order to split reads and writes, well be using the mysqlnd_ms plugin.
Configuration
After installation of the mysqlnd_ms plugin using PECL, well have to configure php.ini as well as the mysqlnd_ms configuration file.
In php.ini, well add the following lines of code:
extension=mysqlnd_ms.so
mysqlnd_ms.enable=1
mysqlnd_ms.config_file=/path/to/mysqlnd_ms.json
Next, create the mysqlnd_ms.json file, which helps to determine the master and slave servers. In addition, the file also help define the “read or write splitting” and “load balancing strategies”.
Our configuration file consists of one master and one slave:
{
"appname": {
"master": {
"master_0": {
"host": "master.mysql.host",
"port": "3306",
"user": "dbuser",
"password": "dbpassword",
"db": "dbname"
}
},
"slave": {
"slave_0": {
"host": "slave.mysql.host",
"port": "3306"
"user": "dbuser",
"password": "dbpassword",
"db": "dbname"
},
}
}
}
You only need to make changes to one setting called as host, and all others are optional.
Routing Queries
The mysqlnd_ms plugin transparently route the queries – by default – that starts with SELECT to the slave servers. Besides this, the plugin route the queries that doesnt start with SELECT to the master.
This can prove good as well as bad for you. Well, being transparent spares you from making any changes to the code. However, you wont be able to know whether a query is read-only or not, as the plugin doesnt analyze the query.
Apart from not only sending a query that does not start with SELECT to the master, the plugin will send a write query with “SELECT..into the slave” that can prove to be a disaster. Fortunately, the plugin boasts the ability to provide hint regarding sending the query to the right server (i.e. master or slave server). For this, it places one among the below listed three SQL hint constants within the query:
- MYSQLND_MS_MASTER_SWITCH: It helps to run the query statement on the master
- MYSQLND_MS_SLAVE_SWITCH: Allows to run the query statement on the slave
- MYSQLND_MS_LAST_USED_SWITCH: This one enables to run the query statement on the server that was used in the last
In order to use any one of the SQL hints, well need to add a comment prior to the query. One of the easiest way to so requires using sprintf(). Lets consider an example, where the mysqlnd_ms plugin is sending a SELECT to the master, using the first SQL hint constant:
$sql = sprintf("/*%s*/ SELECT * FROM table_name;", MYSQLND_MS_MASTER_SWITCH);
Below mentioned query is used for not sending a SELECT to a slave, using the second SQL hint as discussed above:
$sql = sprintf("/*%s*/ CREATE TEMPORARY TABLE `temp_table_name` SELECT * FROM table_name;", MYSQLND_MS_SLAVE_SWITCH);
Now, lets consider an example where the last hint will help you ensure how the same connection is used just like the one for the query mentioned above. This will ensure that switch from the master to reading has been made, after the data is modified, but still hasnt replicated. In addition, it also ensure that the switch is made when carrying out certain transactions including both read as well as write statements.
if ($request->isPost() && $form->isValid()) {
$user>setValues($form->getValues());
$user->save();
}
$sql = sprintf("/*%s*/ SELECT * FROM user_session WHERE user_id = :user_id", MYSQLND_LAST_USED_SWITCH);
Conclusion
You can split read or write between servers using the mysqlnd_ms plugin. Its a useful plugin, especially when you want to move large legacy PHP applications to using distributed read/write. Though the plugin might not appear to be perfect to many users, but it will definitely get you 80-90% of success – and youll be able to move most applications – without fiddling with the code.
Author Bio
Maria Mincey is a web developer by profession and a writer by hobby and works for Xicom Technologies, a PHP development company. She loves sharing information regarding PHP development tips & tricks. If you are looking forward to hire PHP developers then just get in touch with her.
LG touch screen watch Phone Lands In India


By Arnab Ghosh, Gaea News Network
NEW DELHI, INDIA (GaeaTimes.com)- It is not surprising to see mobile phones that perform various other tasks than making or receiving calls nowadays. There are plenty of models in the market that double up as music player and camera. However, it is not everyday that one comes across a touch screen phone that is built in a watch form factor. That is what the LG Watch phone is all about. It looks like a designer watch but inside there is a sophisticated phone brimming with cutting edge features. It weighs only 84 gram and hence one can wear it without straining his wrist. However, this is quite expensive at 40,000 INR and only the hardcore gadget freaks with deep pockets will opt for it.
The LG Watch phone has been launched in India and it is available in LG flagship outlets across the country. The phone uses a capacitive type touch screen resulting in excellent feedback and it displays 256,000 colors. The resolution at 128 x 160 pixels is not much but then you have to consider its unique form factor. The UI is flash based and it is very responsive.
The LG Watch Phone is water resistant which means one can use it in rain without any fear of damaging it. Its music playback capacity is also praiseworthy and there is an equalizer to customize the music quality as per the taste of the uses. The VGA camera is capable of making video calls. There are lots of connectivity options offered by this model. Apart from the GPRS and Edge, there is HSDPA for high spedhttp://gadgetophilia.com

Saturday, February 14, 2015
Free PSD Perspective Mockup Template
Free Download PSD Perspective Mockup Template. Lovely angled perspective mockup, with some extra smart blur on it. Enjoy!
Type : PSD
Category : Mockups
License : Free
Author : Dribbble
Download
Subscribe to:
Comments (Atom)